Sometimes you may want to remove, delete or change the image border of a custom Blogger template or default Blogger template (Blogspot template). In this Blogger tutorial you will learn how easy it is to make changes to your template so that you can get rid of unwanted image borders around all the images that appear in your blog posts or around a single image in a blog post.
You will also learn how to enhance your Blogger template (Blogspot template) by changing the line color and line style of the existing image borders.
Note this Blogger tutorial applies to custom templates and the previous generation of Blogger templates. If you are using the new default Blogger Template Simple please refer to my Blogger tutorial How to Remove the Image Border in Blogger template Simple for instructions
This Blogspot tutorial is rated easy. It involves making minor alterations to your Blogger template (Blogspot template) but this is well within the capabilities of beginner bloggers and newbies. The changes will take less than 5 minutes to complete and can make the world of difference to your Blogger template.

 How to Delete, Remove, Get Rid of the Image Border in Blogger Posts
The following instructions will remove the little border around the images in your Blogger posts.
- Login into Blogger if not already logged in
- From the Dashboard navigate to your blog. Go to Design > Edit HTML by clicking on the Design tab and then choosing the Edit HTML link
- Back up your existing Blogger template by clicking on the Download Full Template button
- Find the following code in your Blogger template (no need to check the Expand Widgets Template box as we are only working with the CSS Style Sheet). Note: the code in Blogger templates varies but this is the code you will find on a Blogger Minima template and most other default Blogger templates.
.post img {
padding:4px;
border:1px solid $bordercolor;
}
If you do not have this code look for the following:
img{
padding: 4px;
border:1px solid $bordercolor;
}
- There are two ways to get rid of the unwanted border image code. You can either:
- Remove the following line:
border:1px solid $bordercolor;
or
- Change it to the following
border:0px;
- Click on the Save Template button
- Click View Blog to admire your post images minus any image border.
How to Change the Color of the Image Border Around Posts in a Blogger Template The following instructions will show you how to change the color of the border which appears around images in your Blogger posts
- Follow Steps 1 to 4 as per removing the image border from Blogger posts.
- There are several methods to change the color of the image border but the easiest is to
- Change the following line:
border:1px solid $bordercolor;
to
border:1px solid #6698FF;
The above change will make the border line color sky blue. To change the color (in red) to your own color choice replace with the hex color code for your chosen color
- Click the Save Template button to save your changes
- Click on View Blog to admire the new color around the images in your Blogger posts
Tips and Troubleshooting- To change the image border line style from a solid line to a dotted line change the word solid to dotted eg
border:1px dotted $bordercolor;
- To change the image border line style from a solid line to a dashed line change the word solid to dashed eg
border:1px dashed $bordercolor;
- To increase the width of the image border change the size from 1px to 2px or 3px eg
border:3px solid $bordercolor;
- To Remove The Image Border Around Only One Image paste the following into your image code in your Blogger post:
style="border:none"
eg
<img style="cursor:pointer; cursor:hand;width: 126px; height: 22px;" src="http://3.bp.blogspot.com/_vLeiVavkV_M/SrRp2wb1I_I/AAAAAAAAAAA/XXXXXXXXX/s200/download-now.png" border="0" style="border:none" alt=""id="BLOGGER_PHOTO_ID_XXXXXXXXXXXX" />
In this Blogger tutorial you have learned how to remove, delete and get rid of the line border which appears around images in your Blogger posts (Blogspot posts). You have also learned how to change the line color of the border image to your own chosen hex color. In addition I have shown you how to change the line style from solid to dotted or dashed and to remove the border around a single image. As always any problems with making these changes please let me know. Good luck!
Related ArticlesList of Blog Know How Tutorials for Blogger BlogsHow to Remove the Image Border in Blogger Simple Template
In this Blogspot tutorial you will learn how to convert your existing Blogger footer (Blogspot footer) into a 3 column footer or a 4 column footer. With more columns in your Blogger footer you will be have the extra room to accommodate more widgets such as Flickr photos and Twitter updates. Also you will be able to put less frequently used widgets such as recents comments, archives, followers, About Me etc at the bottom of your template so that only the most important widgets are loaded first.
This tweak involves adding code to the footer section of your existing Blogger template to change it to 3 columns or 4 columns. The tutorial is not beyond the capabilities of Blogger newbies and webmasters with intermediate skills but care needs to be taken when modifying your Blogger template so back up before you start. For best results a Blogger template with a width of around 900px is best.

How to Add a 3 Column Footer to Blogger
- Log in to Blogger if not already logged in
- Navigate to Layout > Page Elements
- Move any existing widgets out of the footer section and place them in the sidebar temporarily and save changes
- Navigate to Layout > Edit HTML
- Back up your template as a precaution by downloading it to your computer
- Find the following section in your Blogger template
<div id='footer-wrapper'>
<b:section class='footer' id='footer'/>
</div>
If you are having difficulty finding this section trying searching for footer-wrap or something similar as sometimes this section is called something else in some templates.
- To Add a 3 Column Footer to Blogger
Replace all the code located in Step 6 with the following
<div id='footer-columns'>
<div id='footer1' style='width: 30%; float: left; margin:0; text-align: left;'>
<b:section class='footer-column' id='col1' preferred='yes' style='float:left;'/>
</div>
<div id='footer2' style='width: 40%; float: left; margin:0; text-align: left;'>
<b:section class='footer-column' id='col2' preferred='yes' style='float:left;'/>
</div>
<div id='footer3' style='width: 30%; float: right; margin:0; text-align: left;'>
<b:section class='footer-column' id='col3' preferred='yes' style='float:right;'/>
</div>
<div style='clear:both;'/>
</div>
To Add a 3 Column Footer to Blogger with a Lower Footer Section
Replace all the code located in Step 6 with the following
<div id='footer-columns'>
<div id='footer1' style='width: 30%; float: left; margin:0; text-align: left;'>
<b:section class='footer-column' id='col1' preferred='yes' style='float:left;'/>
</div>
<div id='footer2' style='width: 40%; float: left; margin:0; text-align: left;'>
<b:section class='footer-column' id='col2' preferred='yes' style='float:left;'/>
</div>
<div id='footer3' style='width: 30%; float: right; margin:0; text-align: left;'>
<b:section class='footer-column' id='col3' preferred='yes' style='float:right;'/>
</div>
<div style='clear:both;'/>
<p/>
<div id='footer-bottom' style='text-align: center; padding: 10px;'>
<b:section class='footer' id='col-bottom' preferred='yes'>
</b:section>
</div>
<div style='clear:both;'/>
</div>

To Add a 4 Column Footer to Blogger
Replace all the code located in Step 6 with the following
<div id='footer-columns'>
<div id='footer1' style='width: 25%; float: left; margin:0; text-align: left;'>
<b:section class='footer-column' id='col1' preferred='yes' style='float:left;'/>
</div>
<div id='footer2' style='width: 25%; float: left; margin:0; text-align: left;'>
<b:section class='footer-column' id='col2' preferred='yes' style='float:left;'/>
</div>
<div id='footer3' style='width: 25%; float: left; margin:0; text-align: left;'>
<b:section class='footer-column' id='col3' preferred='yes' style='float:left;'/>
</div>
<div id='footer4' style='width: 25%; float: right; margin:0; text-align: left;'>
<b:section class='footer-column' id='col4' preferred='yes' style='float:right;'/>
</div>
<div style='clear:both;'/>
</div>

- Save changes to your Blogger template.
- Navigate to Layout > Page Elements. You will now see a 3 column footer, 3 column footer with a lower section or a 4 column footer depending on what option you chose.
- Move the desired gadgets to the new Blogger footer columns. Create new widgets to fill up the footer columns if necessary. Save your changes.
- Click View Blog to admire your new footer section
Tips and Troubleshooting- To Add Padding Between Footer Columns in Blogger
To create some padding between the columns add the following code to the style section of your Blogger template - before </b:skin> tag.
#footer-columns {
clear:both;
}
.footer-column {
padding: 10px;
}
- To Add a Border to the 3 or 4 Column Blogger Footer
- For Top Border Only of the 3 or 4 Column Footer
Paste the following code before the </b:skin> tag
#footer-columns{
border-top:1px dotted $bordercolor;
clear:both;
margin:0 auto;
}
Replace $bordercolor with a hex color if default color is not displayed. Change this color to suit your template. For example
#footer-columns{
border-top:1px dotted #113355;
clear:both;
margin:0 auto;
}
- For a Box Border Around the 3 or 4 Column Footer
#footer-columns{
border:1px dotted $bordercolor;
clear:both;
margin:0 auto;
}
Replace $bordercolor with a hex color if default color is not displayed. Change this color to suit your template. For example
#footer-columns{
border-top:1px dotted #113355;
clear:both;
margin:0 auto;
}
In today's Blogger tutorial you have learned how to add a 3 column footer or a 4 column footer to your Blogger template (Blogspot template). You have also learned how to add some styling such as a border above the footer and around the footer. As always I am available to answer questions if you need assistance. Good luck!
Related ArticlesList of Blog Know How Tutorials for Blogger BlogsCustomize Blogger Tips
In this tutorial you will learn how to deep link a specific Amazon product directly into your Blogger posts so that the link will appear either on every post page or alternatively only on a selected post page. By deep linking a targeted Amazon product directly to your Blogger blog you can expect to increase your Amazon sales and to make extra money from Blogger. If you wish to learn more about adding Amazon widgets to your blog please refer to my earlier tutorial Make Money Add an Amazon Widget to Blogger

This tutorial provides you with a complete walk through of the process of adding Amazon product links to Blogger. I have rated the tutorial as moderate as it involves setting up the Amazon product link, converting the code and adding a block of code to your Blogger template. All these steps are within the capabilities of the average Blogger user provided you follow the step by step instructions below.
How to Deep Link an Amazon Product to Blogger Posts
This tutorial will show you how to add an Amazon Product Link at the foot of every post in your Blogger blog. If you want your link to appear only on a specific individual post page see Tips and Troubleshooting below for instructions.
Difficulty Level: Moderate
- Sign in to your Amazon Associates account. If you are not a member sign up is free to both Amazon.com and Endless.com
- Click on the Links and Banners tab
- Under the Product Links heading choose the Add Product Links Now link

- From the Product Links page choose your Product Category from the drop down list and enter your search keyword phrase to identify the product you wish to link to. Hit the Go button.

- From the search results choose the individual product you will linking to by clicking on the Get Link button on the right hand side of the product

- You will now be taken to the Customize and Get HTML code page.
- Select Link Type
By default both the product image and text link will display but you can customize it to display the image only or the text only by checking the box alongside these options
- Customize Link
Choose the appearance of your product. With or without a border. Choose color options to suit your blog. I suggest you keep the default setting for the link opening in a new window. Amazon lets you see a live preview of your product on the right so that you can make any adjustments before embedding the code into your blog.
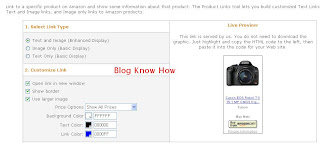
- Once you are satisfied with the product's appearance click on the highlight code button at the foot of the page and copy the HTML code for the Amazon Product Link.
- Open a Javascript to HTML converter such as Centricle. Paste your code into the content window and press the Encode button
- Highlight and copy the code that has been converted
- Login to Blogger if not already logged in
- Navigate to Layout > Edit HTML
- Back up your Blogger template as a precaution
- Check Expand Widget Templates box
- There are several places you may wish your product link to appear. I have assumed for the purposes of this tutorial that you want it at the bottom of your post. Therefore find the following code in your template:
<div class='post-footer-line post-footer-line-3'/>
- Directly below this line paste the converted Amazon HTML code
- Click on Save Template
- Click on View Blog to view your link at the foot of every Blogger post including the home page view.
Tips and TroubleshootingIf you are writing about a lot of different products on your blog you may need to place targeted Amazon product links on your Blogger individual post pages. To have the Amazon Product Link only appear on a specific post page follow these steps.
How To Add an Amazon Product Link to an Individual Blogger PostBefore you get started you will need to know the full URL address of your Blogger post. To get this navigate in a new window to the specific post page of your Blogger blog and copy the address from the address bar at the top of your browser
- Follow steps 1 to 13 as per adding an Amazon Product Link to the foot of every Blogger post.
- Find the following code:
<div class='post-footer-line post-footer-line-3'/>
- Directly below this line paste the following code:
<b:if cond='data:blog.url == "your blog post URL including http://"'>
Paste your Amazon code here
</b:if>
- Replace "your blog post URL including http://" with the URL address of your blog post
- Paste over "Paste your Amazon code here" with your converted Amazon HTML code
- Click on Save Template
- Click View Blog and navigate to the individual post page to see your Amazon Product Link at the foot of your Blogger post (Blogspot post)
In this tutorial you have learned how to add an Amazon Product Link to your Blogger posts (Blogspot posts). I have also shown you how to embed an Amazon Product Link directly into a specific Blogger post. By adding targeted Amazon product links to your Blogger blog you can expect to make extra money from your blog. I would love to hear from anyone about their experiences of adding Amazon widgets or product links to their Blogger blog so if you have the time please let me know how you get on.
Related ArticlesList of Blog Know How Tutorials for Blogger BlogsMake Money Add an Amazon Widget to BloggerAdd Chititka Ads to Blogger Blogspot BlogAdd an Affiliate Banner or Adsense Above Blogger HeaderAdd an Affiliate Banner to Blogger HeaderAdd an Affiliate Banner to Blogger SidebarAdd an Affiliate Banner Below Blogger PostMake Money Add Banner Ads to Blogger5 Ways to Make Money from BloggerBlogger Guide to Google Adsense PlacementAdd Paypal Donate Button to BloggerBlogger Guide to Google Adsense Myths