BlogKnowHow apologies for the technical problems with the site. We are working on it and hope to resolve the issue as soon as possible.

Monday, November 30, 2009

Add Your Blogger Blog to Facebook

In today's Blogger tutorial I will show how to add your Blogger blog (Blogspot blog) to Facebook so that your updated content can be read right from your Facebook profile. Importing your Blogger blog into Facebook will only take you a few minutes to set up but will likely produce quite a few extra readers.

By importing your blog into Facebook your Blogger posts become available to all your Facebook friends and family. Everytime you post new articles to your Blogger blog they will automatically appear on your Wall in Facebook and in your friends News Feeds. It is also possible to remove any content that you do not wish to be displayed which may be handy for some.

Advantages of Importing Your Blog into Facebook

  • Increase your web presence
  • Enjoy added interest in your blog articles and new readers
  • No need to replicate your blog articles or content on Facebook

Disadvantages of Importing Your Blog into Facebook
  • If you blog for profit think carefully about importing your Blogger blog into Facebook as you are likely to experience a drop off in traffic and a reduction in revenue earnings as fewer people will visit your actual blog. One possible way around this is to set your blog's RSS feed to show summaries only that way ensuring that anyone interested will need to visit your blog to read the whole article.

How to Import or Add Your Blogger Blog to Facebook
  1. Login to Facebook or Sign up to Facebook if you are not already a member

  2. From your Facebook profile page go to Settings > Application Settings which you will find in the top right hand corner


  3. Select Notes from the list of applications displayed on the page

  4. Click on Import a Blog in the right sidebar

    Facebook - Add Notes Screen (Settings, Applications Settings, Notes)
  5. Enter the URL address of your blog

    either website URL:
    http://blogknowhow.blogspot.com

    or your Blogger feed: http://blogknowhow.blogspot.com/feeds/posts/default?alt=rss
    Please note it is not necessary to add the feed of your blog as Facebook will autodetect this


    Facebook - Import a Blog Screen
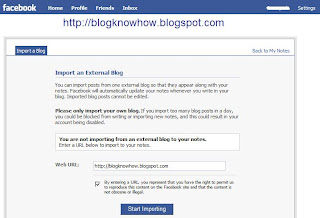
  6. You will need to tick the box below this to confirm that the content is not illegal or obscene and that you have the right to permit Facebook to reproduce the content of your blog. Any problems click Cancel and reenter your blog URL address

  7. Click Start Importing

  8. Facebook will now import your feed and you will be taken to a preview screen to make sure the content matches your blog. If it does go ahead and confirm the import by clicking on the Confirm Import button

    Facebook - Preview Screen for import a blog showing latest content

  9. Go to your Wall in Facebook to check that your Blogger posts are now available to all your Facebook friends and family.


Tips and Troubleshooting
  • If your Blogger blog is members only the blog import will fail as Facebook will be unable to detect your blog's feed

  • To remove a blog post from your Wall in Facebook click on the Remove button on the righthand side

  • If your images are not displaying (there seems to be a bit of a glitch with this) then you may need to try importing your blog using Networked Blogs


In this Blogger tutorial I have discussed how to import your Blogger blog into your Facebook profile. I have also pointed out some advantages and disadvantages of adding your Blogger blog to your Facebook profile. I will be talking some more about importing blogs into Facebook in the future which is likely to be of interest to those with multiple Blogger blogs.


Related Articles
List of Blog Know How Tutorials for Blogger Blogs

Monday, November 2, 2009

Add Profile Images to Blogger Comments

Today I will show you how easy it is to have Blogger (Blogspot) display profile images in the embedded comments section of your blog even if you are using a custom template.

About a month ago Blogger announced that it was enabling profile images (profile avatars) in the embedded comments section on Blogger (Blogspot) as part of its 10th birthday feature series. The new profile image feature which has been available on other commenting options has now been extended to the embedded comments option. This is good news if you are using a default template as you will now see a small avatar next to your visitors comments and your own avatar if you have uploaded a profile image.


Default Blogger Templates - Enabling Profile Images
Profile images work on default Blogger templates and have been automatically enabled by Blogger. If you are using a default Blogger template with embedded comments enabled and have recent comments on a post you will see a profile image to the left of visitor comments (provided they have uploaded one that is). Your profile avatar will also display when you respond to visitor comments again provided you have uploaded one. (To upload your profile photo click on Add Photo at the Dashboard). If profile images are not displayed enable them by going to Settings > Comments and checking the Yes radio button at the bottom of the page which says Profile Images Enabled.

Custom Blogger Templates - Enabling Profile Images
If you are using a custom template you may still be able to see profile images in your embedded comments section. Check out Settings > Comments to make sure Profile Images are enabled. If you can't see profile images you can still add this feature by tweaking your Blogger template. Follow the instructions below to have Blogger display profile images in the embedded comments section of your custom Blogger template.

Add Profile Images to Comments Section of a Custom Blogger Template
If you are using a custom Blogger template you can use the following method to add profile images to the embedded comments section of your Blogger template.

  1. Login to Blogger if not already logged in

  2. Go to Design > Edit HTML

  3. Back up your Blogger template as a precaution by downloading the full template to your computer

  4. Expand Widget Templates by checking the box on the right hand side

  5. Find the following line in your Blogger template by using CTRL + F:

    <dl id='comments-block'>

  6. Change the above line to the following:

    <dl expr:class='data:post.avatarIndentClass' id='comments-block'>

  7. Scroll down a few lines and find the following line in your Blogger template:

    <a expr:name='data:comment.anchorName'/>

  8. Directly before the above line paste the following code block:

    <b:if cond='data:comment.favicon'>
    <img expr:src='data:comment.favicon' height='35px' style='margin-bottom:-2px;' width='35px'/>
    </b:if>
    <a expr:name='data:comment.anchorName'/>
    <b:if cond='data:blog.enabledCommentProfileImages'>
    <data:comment.authorAvatarImage/>
    </b:if>

  9. Click Save Template

  10. Click View Blog and navigate to a page with commenting to see avatars next to comments in the embedded comments area


Tips and Troubleshooting
  • If you have added the author commenting highlight hack to your Blogger template there will be 2 instances of the code at Step 7 to change

  • If your template does not have the code mentioned in Step 5 and Step 6 check that dl has not be replaced by div. In this case leave the div as is and replace the rest of the code in the line.

  • Blogger has only enabled profile images for Blogger and Google profiles so if your visitors comment using identities such as "Anonymous" or "Name/URL" their image profile will not be displayed. If OpenID, AIM or other identities are used these favicons will be displayed instead.

  • Profile avatars load last so they will not prevent visitors viewing your content if you have a lot of comments on some pages


In today's Blogger tutorial (Blogspot tutorial) you have learned how to enable profile images in the embedded comments section in Blogger. If you are using a default Blogger template this can be achieved by enabling profile avatars in your Blogger template. If you are using a third party custom template I have shown you a Blogger hack that will display profile images next to comments on your blog. As always I am interested in how you get on with this tweak. Good luck!


Related Articles
List of Blog Know How Tutorials for Blogger Blogs
Add Missing Embedded Comments Section to a Blogger Template
Embed Comments Form in a Blogger Template
How to Get More Comments on a Blogger Blog

Sunday, November 1, 2009

Add CSS Styling to Blockquotes in a Blogger Template

Today I continue the series of Blogger tutorials (Blogspot tutorials) by showing you how to apply CSS styling to blockquotes in a Blogger template. Other articles I have already published on the subject of CSS styling include:

How to Add, Delete or Remove Blogger Image Borders
How to Align and Justify Posts in Blogger
How to Add a Divider Between Blogger Posts
How to Add or Change a Background Image in a Blogger Template.

Today's tutorial on Blogger blockquotes will be useful if you are using a default Blogger template or a third party custom template. It will show you how to change your blockquote area in the following ways:

  • Add a background color to the blockquote
  • Add a border around the background of the blockquote
  • Add or change the color of the blockquote text
  • Add or change padding around the text
  • Add or change the margin
  • Add a background image

Blogger beginners you can relax as I have written this Blogger tutorial with you in mind. I will walk you through the steps of styling the blockquote section and you will see that it is not as daunting as it first appears. This Blogger tutorial assumes no knowledge of CSS styling. I have rated the difficulty level as easy to medium because it does involve making adjustments to your Blogger template.

How to Change the Blockquote Section of a Blogger Template

First of all let's take a look at the CSS Styling for the blockquote section of a default Minima Blogger template.

.post-body blockquote {
line-height:1.3em;
}

.post blockquote {
margin:1em 20px;
}

.post blockquote p {
margin:.75em 0;
}

As you can see the blockquotes area of this Minima template has minimal styling. Apart from line height and margin indentation there has been no additional code added to improve the look of the template.

Minima Blockquotes No Extra CSS Styling
Let's go ahead and give the blockquotes in your Blogger posts some styling. I will use the Minima template to show you but you can do the same for another default template or custom template. As always back up your Blogger template by downloading it to your computer before you begin to make any changes.

  1. CSS Styling to Add a Background Color to Blockquotes
    Adding a background color to the blockquote area can be achieved in 1 of 2 ways.

    1. One way is to enter the hex color directly into the styling as I have done below. This code will add a light grey background to the blockquote area.

      .post-body blockquote {
      line-height:1.3em;
      background-color: #cccccc;
      }

    2. Another way to add a background color using CSS styling for the blockquote area is to make use of the variable names already set up. The border color is light grey #cccccc by default in a Minima template. The advantage of this option is that if you decide to change the border color under Layout > Fonts and Colors the blockquote color will automatically change to the new color too.

      .post-body blockquote {
      line-height:1.3em;
      background-color: $bordercolor;
      }

      If you wanted the background color to be the same as the blog title color rather than the border color you would write this instead

      .post-body blockquote {
      line-height:1.3em;
      background-color: $titlecolor;
      }

  2. CSS Styling to Add a Border Around Blockquotes
    You have your background in place now let's add a narrow border around the background to add some more definition. The following will add a 1px solid border around the outside of your blockquote area in your Blogger posts.

    .post-body blockquote {
    line-height:1.3em;
    background-color: #cccccc;
    border: 1px solid #cc6600;
    }

    or if using variables

    .post-body blockquote {
    line-height:1.3em;
    background-color: $bordercolor;
    border: 1px solid $titlecolor;
    }

    Blockquotes With a Background and Background Border
  3. CSS Styling to Add Padding Around Blockquotes
    Now if we were to leave the styling at this point one of the problems would be that the text would butt up against the background which is not a good look. To create some space between the text and the background edge all the way around we use CSS styling to add some padding like this:

    .post-body blockquote {
    line-height:1.3em;
    background-color: #cccccc;
    border: 1px solid #cc6600;
    padding: 20 px;
    }

    or if using variables

    .post-body blockquote {
    line-height:1.3em;
    background-color: $bordercolor;
    border: 1px solid $titlecolor;
    padding: 20 px;
    }

    Blockquotes With a Background, Background Border and Padding
  4. CSS Styling to Add or Change the Text Color of Blockquotes
    If you want to accent your blockquote area in your posts one effective way to do this is to make the blockquote text color a different color from the text color of your pages. We do this by picking a color and adding the following line to the code:

    .post-body blockquote {
    line-height:1.3em;
    background-color: #cccccc;
    border: 1px solid #cc6600;
    padding: 20 px;
    color: #cc6600
    }

    or if using variables

    .post-body blockquote {
    line-height:1.3em;
    background-color: $bordercolor;
    border: 1px solid $titlecolor;
    padding: 20 px;
    color: $titlecolor;
    }

    Blockquotes With a Background, Background Border, Padding and Change of Text Color

Tips and Troubleshooting
If you want to add further modifications to the blockquotes area of your Blogger template here are several other possibilities.

  1. CSS Styling To Change the Margin of Blockquotes
    You can increase the margin from 1em to 1.5em by changing the margin line to
    margin: 1.5em 20px;

  2. CSS Styling to Add a Background Image to Blockquotes
    You can have your own image as a background in your blockquotes area of your posts by adding this line:

    background: url(http://URL of your image.jpg);

In today's Blogger tutorial (Blogspot tutorial) you have learned how to add CSS styling to the blockquotes area of your Blogger posts. I have shown you how to add a background, a background border, change the text color, add padding, change the margin and add a background image to the blockquotes code block. If you have a moment please let me know how you got on customizing your own Blogger template. Any questions please ask.


Related Articles
List of Blog Know How Tutorials for Blogger Blogs
How to Add, Delete or Remove Blogger Image Borders
How to Align and Justify Posts in Blogger
How to Add a Divider Between Blogger Posts
How to Add or Change a Background Image in a Blogger Template

Monday, October 26, 2009

Add or Change Background Image of a Blogger Template

In today's Blogger tutorial (Blogspot tutorial) I will show you how to both add a background image to a Blogger template if you don't have one already or change the existing background of your Blogger template.

I have chosen to write this article not because there aren't any how to articles already on the net but because they assume quite a bit of knowledge. I have taken a different tack with this post in that I assume you are an absolute beginner with no knowledge of Blogger templates.

For this reason I have provided some sample backgrounds for you to play around with. By just cutting and pasting these images you can see first hand how dramatically adding a different background to your Blogger template can change it. You will see that replacing your background image with these images isn't that difficult and hopefully it will give the confidence to branch out further and change the background of your Blogger template to suit your own needs. All that is needed is to insert a small snippet of code into the CSS styling section of your Blogger template and hey presto your Blogger template will take on a whole new look.

How to Change the Color of a Blogger Background (Default Templates)
If you are using a default Blogger template then you already have the option to change the background color to your own taste by going to Layout > Fonts and Colors. Some third party custom Blogger templates have this option too but by no means all. For instructions on changing the background color of custom templates see tips and troubleshooting below.

How to Add a Background Image to a Blogger Template

  1. Log in to Blogger if not already logged in

  2. Go to Layout > Edit HTML

  3. Back up your Blogger template as a precaution by downloading the full template to your computer

  4. Find the following line in your Blogger template

    body {

  5. Add the following line directly after this line
    background-image: url(URL address of your image);

    Your block of code will now look like this:

    body {
    background-image: url(URL address of your image);
    (existing code in this block)
    }

  6. Now replace the code in red for the URL address of your image. Choose an image from the selection below to practise with or use your own image. Note if using your own image make sure you read the tips and troubleshooting section below.


    https://blogger.googleusercontent.com/img/b/R29vZ2xl/AVvXsEih2q4FuC0S4bPaROk3Si7h4KLEY5rs6E_xbNhyoDFpMJ1pWmYwff3IvRWOWN6si7UGPGtfIx8Bs3PqahnwejIg4nkjP04S7UsWwJDcxijmhEUjjVIVKebrh4w4x108ekrbg1bGi14xPE8/s320/background_047.gif


    https://blogger.googleusercontent.com/img/b/R29vZ2xl/AVvXsEgt5dmWLoIqPih9KAGsVlSRsBatSw39ncVz48PgUfT1C3r4VI-Sn5UtLG-iC6qULgKNXmlBo2NfdQfFMQtWz6fckxMgGfmG9rRopuprOSDUvH8l2i_KC5NgBExO5eeiCG4efd6hoOeXZMU/s320/background_104.gif


    https://blogger.googleusercontent.com/img/b/R29vZ2xl/AVvXsEjE2Nb-dBQ6C_Yvs8gzgHv_rRzes7iuBCgRPSSzZIF_DuANKILIu-KAxtYe3hD3IFpjeD76Ei9bb-DeZsb_52-UP6_1MWU3re2zNcNtvNz6a0F-NlZXC4AG76SGNg6WKHNBvHSQg8cRENM/s320/background_126.gif


    https://blogger.googleusercontent.com/img/b/R29vZ2xl/AVvXsEgAtmAaGXuMZIa5GS2H6yRMwwyEIOb-HBp6Ly4F47c2Cu6S38MBeucJFKriUxfDHKgwrGQhdIBQUjnvnYsqEfB6sDmsDFRXCcckqquJTbFcfNIxPzJMvZFiOzWt96LVZsJ6_ZYp63XD8Ps/s320/background_073.gif


    https://blogger.googleusercontent.com/img/b/R29vZ2xl/AVvXsEgAs8BOjOaWKV1rHweq29iv7IRHgGrJZoq1ry6_idL9TsOBqf9OpmEAl0fuqJvykpZJPaysc0MuGpXMNYALN5lW1ID_IErn8K6rpWkCz_2IkZ5V-a1nuuBfxvyHmrldrphZBADzymGeV2I/s320/background_083.gif

    Green Paws Background

    https://blogger.googleusercontent.com/img/b/R29vZ2xl/AVvXsEiqDRGyc-6Ez-u_XtEiLlYpA4PELBQHO-_5xz7WzTlekmTJs9JVm-whanG5Ci_nO3j3TTkvyQ5iY-n97GEiflV2jUcmRCDUnetPVIQHzAZwkm6_3RZOpzu_SujVAtgzc3DCHD0eDQmHiOk/s320/green-paws.gif

    Musical Notes Background

    https://blogger.googleusercontent.com/img/b/R29vZ2xl/AVvXsEjX34iSoCvPabycFw3NAnjDqaq-1cEtcxyDjSln0ueU4BsajdQuZwfg5uMmHU2QRFVeDFrPooZmduIIPGT3oVSFZ0JptYEG1VkT8cvLKu3n4x7htFO7DchM2dqG1pkoKhSsYLXYbbWXKLY/s320/melody.gif

  7. Use the Preview button to see the effect of these different backgrounds on your template. It will help you get an idea of the kind of possibilities out there.

  8. You are welcome to use one of the above Blogger backgrounds as they are all free to use without any restriction. If you decide to use one of these simply click on Save Template and you are in business. Alternatively go ahead and find your own background image on the net and follow the instructions below to insert it into your Blogger template.

Tips and Troubleshooting

  • To Add Your Own Image to a Blogger Template
    There are huge number of backgrounds on the net that are suitable for Blogger. Search under free website backgrounds in your favorite search engine to find these.

    Simply download your preferred background and save to an image service like Photobucket, Flickr.

    Make sure the file format is either a .jpg, .gif or .png and that its size does not exceed 100kbs. As a rule of thumb an image size of around 30kb or less is about right if loading time speed is not to be compromised. Larger images can be resized quickly by using an online resizing service such as Shrink Pictures.

    Follow the instructions above to change the URL to that of your image.

  • To Change the Background Color of Your Custom Blogger Template
    If there is no option to change the background color of your Blogger template in Layout > Fonts and Colors you can still change the color manually.

    1. Follow steps 1 to 4 as above

    2. Find the line beginning with :

      background-color: #

    3. The hex color will be different for each template. We will change the color only

      background-color: #change hex color code to your chosen color;

    4. Replace the existing hex color code with the value of your chosen hex color. List of web safe hex colors. For example insert the following code to change the background color to:

      Denim Blue
      background-color: #336699;

      Black
      background-color: #000000;

      White
      background-color: #ffffff;

    5. Use the Preview button to see the effect of each color before you save it.

    6. Once you are satisfied go ahead and click on Save Template

Today's Blogger tutorial (Blogspot tutorial) aimed at Blogger beginners continues the series on CSS styling for Blogger. You have learned how to add the background image to your Blogger template or change the existing background image. To help you gain confidence in changing the background image I have provided some sample images for you to practise with. Also in this Blogger tutorial you have learned how to change the color of your Blogger background if you prefer a plain solid background color rather than a background image. As always if you strike any problems implementing the tips in this tutorial please let me know.

Related Articles
List of Blog Know How Tutorials for Blogger Blogs
How to Add, Delete or Remove Blogger Image Borders
How to Align and Justify Posts in Blogger
How to Add a Divider Between Blogger Posts

Friday, October 16, 2009

Add a Post Divider Between Blogger Posts

In today's Blogger tutorial I show you how to enhance your Blogger blog (Blogspot blog) by adding a post divider to your Blogger template. Used effectively post dividers can really jazz up your blog and will lend it that individual feel which most of us are hoping to create.

This tweak is very easy and well within the capabilities of any Blogspot blogger. Only a few simple changes to your Blogger template are required and these are in the CSS styling section.

How to add a post divider between posts in Blogger
By way of example I will use a divider that I downloaded from the internet free by searching for free divider graphics. Here are some sample dividers you can use to get started:


URL address:
https://blogger.googleusercontent.com/img/b/R29vZ2xl/AVvXsEgB0icfjkH1ytPfsOuVta9fGy8ruK8792q5ww3WMLLVAOgY7vW7kj7faHUlnBQLgltgZAaj_ccKhYXwCHEYqJhyphenhyphensEzPSv7jEsQ7bjYx50WUZGs9xIxDV8oOLo3oDBV0QWZn-eL6tSeEvcg/s400/ribbon.gif


URL address:
https://blogger.googleusercontent.com/img/b/R29vZ2xl/AVvXsEj_hejEcgAo5naB6wW-2gGD4Ex9GtJi1T4PaXHO7GUbhMlHhGxxfPz7pq1aCOJITjf2JVMSF3lC4xXUiumbyiutIrJcqisQ8zzFtFSeqEyIwesa8Mh-aFnE0GayjNfdv64f8mliZ_TYvqw/s400/bar1.gif


URL address:
https://blogger.googleusercontent.com/img/b/R29vZ2xl/AVvXsEgPVmOE9V0fNx4o70tklaOa8exaVHZ16HeHInLJKY29b1Gpl4H1qHDawqKw_5QPyEcvgGkacySiW4jOWDCtQl6jiGv93GsZ1zchkSGdQMkdKKEpEUJlkWyDJ0Ef1qmRYYlYO394119v2cA/s400/barbsmpl.jpg


URL address:
https://blogger.googleusercontent.com/img/b/R29vZ2xl/AVvXsEgeYegENYuO7JQ1dH4MZkTmPxbjih_AEOmxG6BEbxhE-0AV5NzVv2HBCZj8ZHsieNQQJAq7MoLw5QzrR6w9J7_4WyB3hOj7VpmsLJlYviqTCWwLnp_9phx7cV599e3TS7H9Eg1L9TB2BGI/s400/bar47.gif


How to Add a Divider Between Posts in Blogger

  1. Login to Blogger if not already logged in

  2. From the Dashboard navigate to Layout > Edit HTML

  3. Back up your Blogger template as a precaution by downloading it to your computer

  4. Find the following line of code in your template:

    .post {

    You are likely to have something like this in your template already:

    .post {
    margin:.5em 0 1.5em;
    border-bottom:1px dotted $bordercolor;
    padding-bottom:1.5em;
    }

  5. Paste the following lines of code to this block making sure you paste them before the closing curly bracket:

    background: url(https://blogger.googleusercontent.com/img/b/R29vZ2xl/AVvXsEgB0icfjkH1ytPfsOuVta9fGy8ruK8792q5ww3WMLLVAOgY7vW7kj7faHUlnBQLgltgZAaj_ccKhYXwCHEYqJhyphenhyphensEzPSv7jEsQ7bjYx50WUZGs9xIxDV8oOLo3oDBV0QWZn-eL6tSeEvcg/s400/ribbon.gif);
    background-repeat: no-repeat;
    background-position: bottom center;
    margin:.5em 0 1.5em;
    padding-bottom:1.5em;

  6. If any lines are duplicated remove them.

  7. Remove any line beginning with: border-bottom: eg

    border-bottom:1px dotted $bordercolor;

  8. You will now have a block of code which looks like this plus any extra lines from the existing code in this block:

    .post {
    background: url(https://blogger.googleusercontent.com/img/b/R29vZ2xl/AVvXsEgB0icfjkH1ytPfsOuVta9fGy8ruK8792q5ww3WMLLVAOgY7vW7kj7faHUlnBQLgltgZAaj_ccKhYXwCHEYqJhyphenhyphensEzPSv7jEsQ7bjYx50WUZGs9xIxDV8oOLo3oDBV0QWZn-eL6tSeEvcg/s400/ribbon.gif);
    background-repeat: no-repeat;
    background-position: bottom center;
    margin:.5em 0 1.5em;
    padding-bottom:1.5em;
    }

  9. Click on Save Template to save your changes

  10. Click on View Blog to see your new post divider between posts

Tips and Troubleshooting
  • To change the divider to one of the above replace the URL address of the image (in red) with the URL address of the new image you want to use.

  • To use your own divider image download to your computer from the internet and then save the image to a photo image service like Photobucket. Replace the divider image URL address (in red) with the URL address of your new image

  • To increase the padding around the divider change the following line of code:

    padding-bottom:1.5em;

    to

    padding-bottom:2.5em;

In today's Blogger tutorial you have learned how to insert a divider between your Blogger posts to enhance the look of your Blogger template (Blogspot template). You can either make your own post divider or download one from the myriad of free website dividers available on the net.

Related Articles
List of Blog Know How Tutorials for Blogger Blogs
How to Add, Delete or Remove Blogger Image Borders
How to Align and Justify Posts in Blogger

Sunday, October 11, 2009

Add a Twitter Profile Widget to Blogger

If you use Twitter then you are going to want to let your Blogger readers know about it. One effective way to show your Twitter updates on Blogger is to add a Twitter profile widget to the sidebar of your blog. This widget is quite a bit more fancy than the current Twitter Updates Widget available through Blogger which I showed you how to insert into your blog in my recent article Add a Twitter Updates Widget to Blogger. On the minus side the widget may slow your blog down so test it out first if fast loading time is crucial to you.

Twitter Profile Widget - how to insert into Blogger
How to Insert a Twitter Profile Widget into Blogger

  1. Go to Twitter Widgets and sign in


  2. Choose Profile Widget and you will be taken to a default profile widget page where you can customize your Twitter widget according to your needs.

  3. Choose Settings and make sure that your username is correct

  4. Choose Appearance and make any custom color changes you need to so that the widget will blend into your blog. At the very least you will need to change the shell background and the links colors to suit your blog

  5. Choose Dimensions and change the sizing of the widget if it is too large to fit into your Blogger sidebar. The default setting is 250x300

  6. Click on Test Your Settings to ensure your new widget looks the way you want it to

  7. Click the Finish and Grab Code button

  8. Copy the code by right click the mouse in the code box and choosing Select All. Right click again and choose Copy

  9. Sign in to Blogger. From the Dashboard go to Layout | Page Elements

  10. In the sidebar choose Add a Gadget and then a HTML/Javascript widget

  11. Paste the Twitter code into the gadget content box and click Save

  12. Your Twitter Profile Widget will now be showing in your Blogger sidebar so click on View Blog to admire it

In this Blogger tutorial I have showed you how to add a Twitter Profile Widget to the sidebar of your Blogger blog (Blogspot blog). This Twitter widget will encourage your blog readers to visit your Twitter Profile and with luck you may get some new Twitter followers out of it.

Related Articles
List of Blog Know How Tutorials for Blogger Blogs
Add a Twitter Updates Widget to Blogger
Add Twitter Button or Twitter Badge to Blogger
Add Twitter Followers Counter to Blogger
Add a Social Bookmarking Button to Blogger
Add Social Bookmark Buttons to Blogger
Best Free Social Bookmark Icon Sets for Blogger

Saturday, October 10, 2009

Add a Simple Drop Down Menu to Blogger

In today's Blogger tutorial I show you how to add a simple drop down menu widget sometimes called a select box to the sidebar of your Blogger blog (Blogspot blog). If you want to add lots of links to your Blogger blog but are worried about the amount of space this will take up on your blog this tutorial is for you. A drop down widget is a neat solution to the cluttered sidebar problem as it is both space saving and easy to install. The convenience of a drop down menu widget can be seen on many blogs where it is used for lists like a long Blogroll, Categories list, Labels list or a Recommended Posts list.

How to Add a Drop Down Menu Widget to Blogger
Adding a drop down menu to Blogger is well within the capabilities of even beginner bloggers. Most of the work is in cutting and pasting the links which is not difficult for anyone with basic computer skills. So let's get started but first here is a working drop down menu list with links to various posts in my blog:


  1. Log in to Blogger if not already logged in

  2. Navigate from the Dashboard to Layout > Page Elements.

  3. Click on Add a Gadget in the sidebar or other location if you wish

  4. Select a HTML/JavaScript gadget from the list of gadgets

  5. Paste the following code into the content box of the widget:

    <form><select name="menu" onchange="window.open(this.options[this.selectedIndex].value,'_blank')"
    size=1 name=menu>
    <option>- Your Menu Title -</option>

    <!-- Change the following links to your own -->

    <option value="http://URL of link1">Link 1</option>
    <option value="http://URL of link2">Link 2</option>
    <option value="http://URL of link3">Link 3</option>
    <option value="http://URL of link4">Link 4</option>
    <option value="http://URL of link5">Link 5</option>

    <option value="http://blogknowhow.blogspot.com">Blog Know How</option>
    </select></form>

  6. Replace _blank as follows:

    • To have a new window open leave the same

    • To have the new page appear in the same window replace _self


  7. Replace - Your Menu Title - with a title of your own

  8. For each instance of the option values highlighted in red substitute your own links and link names. For example:

    <option value="http://blogknowhow.blogspot.com">Blog Know How</option>

  9. Click Save

  10. Use drag and drop to position the drop down menu widget in the location you want it within your sidebar and save any changes

  11. Click View Blog to admire the new drop down menu in the sidebar of your blog

In today's Blogger tutorial I have provided you with instructions to create and insert a simple drop down menu widget in the sidebar of your Blogger blog (Blogspot blog). This widget is ideal for reducing clutter on your Blogger sidebar and excellent for displaying long lists of links such as labels in a convenient, neat and space saving way. A drop down menu gadget is easily installed from the Layout > Page Elements page and can be customized to your own specifications. Any problems with this Blogger tweak please let me know. Enjoy!


Related Articles
List of Blog Know How Tutorials for Blogger Blogs
Add Breadcrumb Navigation to Blogger
Add Horizontal Links Menu Navigation to Blogger

Friday, October 9, 2009

Blogger Read More Links in Posts with Jump Breaks Feature

In this Blogger tutorial you will learn how to insert jump breaks into your Blogger posts (Blogspot posts) as an aid to quick navigation for your visitors. Jump Breaks in Blogger provide an easy way to show only a snippet of your whole post on the home page of your blog with a read more link below it for the rest of the story.

I have already written about a Blogger expandable post summaries hack which provides a read more feature for a Blogger blog homepage. For most Blogger webpublishers (Blogspot webpublishers) this hack is no longer necessary because Blogger as part of its 10th birthday celebration introduced a new feature called Jump Breaks. I cover several methods to insert jump breaks depending on whether you are using a Blogger default template or a customized Blogger template.

The advantage of adding jump breaks to your Blogger posts is that your readers can quickly and easily skim your most recent posts for what interests them rather than having to scroll through a whole bunch of long articles. This is definitely a big help for those of us like me who often write articles longer than 500 words. If your posts are short and sweet you may find that adding this read more feature is unnecessary however you can still apply it when you do have a longer post. Below is an example post which illustrates the Jump Break feature in action.

Example post showing Blogger new jump breaks read more feature
How to Insert Jump Breaks (Read More Links) in Blogger
It is easy to insert a Jump Break into your Blogger posts (Blogspot posts) at any point of your choosing.

There are two methods of inserting the Jump Breaks in Blogger. Which method you choose depends on which post editor you are using. If you are not sure which editor you are using check this out by going to Settings > Basic and scrolling to the bottom of the page. Under Global Settings you will see a radio button next to old editor or updated editor.

Select Blogger editor from Settings, Basic

  1. Method 1
    Insert Jump Breaks - New Blogger Post Editor Only

    In order to use this method you need to be using the updated editor in Blogger or have Blogger in Draft enabled.

    • When creating a new post in the Blogger Post Editor position the cursor in the editor at the point you wish the Jump Break to be inserted

    • Click on the insert Jump Break icon (currently the last option on the menu)

    Click on the Jump Break Icon to insert a jump break into a Blogger post
    • A jagged dividing line will appear to mark the insertion point

    A divider line indicates where the jump break will occur
    • Publish your post as normal


  2. Method 2
    Insert Jump Breaks - Old Blogger Post Editor Only

    If you are using the old post editor rather than the new post editor you can still insert jump breaks into your Blogger posts.

    • When creating a new post in the Blogger Post Editor make sure you are in the Edit HTML mode rather than compose mode

    • Insert the following code at the point where you want to break the Jump Break to occur:

      <!-- more -->

    • Publish post as normal

Tips and Troubleshooting
  1. To Add Jump Breaks to New Posts Automatically
    To save time it is possible to automatically add Jump Breaks to posts with the following method:

    • Go to Settings > Formatting and scroll to the bottom of the page

    • Under Post Template paste <!-- more --> into the box and save. The next time you create a new post the <!-- more --> will automatically appear. Make sure you are in the Edit HTML mode to see <!-- more --> appear.

    Add the code to your Post Template in Settings | Formatting to automate Jump Breaks
  2. To Change the Read More Text
    If you want to change the Read More text for something like Read Full Story or Continue Reading you can easily do this by:

    • Go to Design > Page Elements

    • Edit the Blog Posts widget

    • Change the post page link text (Read More text) which appears at the top of the page to your preferred text and save

    Jump breaks page link text can be changed via Blogger Layout  Page Elements  Edit Blog Posts
  3. To Manually Add Jump Breaks to Blogger For Users of Customized Templates
    If you are using highly a customized template or have customized your Blog Posts widget you may experience a problem in getting the Blogger Jump Break feature to work. In this event you can edit your Blogger template to enable Jump Breaks.

    • As a precaution back up your template by downloading full template to your own computer

    • Tick the Expand Widget Templates checkbox

    • Using CTRL + F find the following line of code:

      <data:post.body/>

    • Directly below this line insert the following code into your Blogger template:

      <b:if cond='data:post.hasJumpLink'>
      <div class='jump-link'>
      <a expr:href='data:post.url + "#more"'><data:post.jumpText/></a>
      </div>
      </b:if>

In this tutorial you have learned how to create expandable post summaries using the new Blogger feature Jump Breaks. You now have the option to easily insert Jump Breaks into your Blogger posts so that longer posts appear with only an introduction followed by a Read More link.

I have shown you 2 methods to insert the Jump Breaks and Read More links into your Blogger posts depending on whether you are using the new or old post editor features. I have also given you some tips to make sure you get the most out of the Blogger Jump Break feature including what to do if the Jump Breaks feature does not work with your customized Blogger template. As always I would welcome your feedback about your experiences with the expandable post summaries Blogger feature (Blogspot feature) or any other feature you may be having an issue with.

Related Articles
List of Blog Know How Tutorials for Blogger Blogs
Blogger Buzz - You Might as well Jump!

Monday, October 5, 2009

Add Twitter Retweet Button to Blogger

Did you know that Twitter can help drive traffic to your Blogspot blog? In today's Blogger tutorial I show you how to add a free Twitter Retweet button to your Blogger posts. Adding a Tweetmeme Twitter Retweet button to Blogger will help promote your blog on Twitter in 2 ways: one by attracting new Twitter followers and two by increasing the direct traffic to your blog from Twitter.

Forget the preamble and take me straight to the instructions to insert the Retweet button into Blogger

What is Twitter and How Does it Work?
Twitter is currently the fastest growing free social networking site. Essentially, Twitter users micro blog about what they are doing or what others are doing by posting tweets of around 140 characters to Twitter. When Twitter members read these tweets and like what they read they can become followers much in the same way that your readers can choose to follow your blog.

Twitter is great news for bloggers because it can be used as a vehicle to promote blogs. Blogger can easily be linked with Twitter services so that every time a post is made to Blogger a short message with a link is posted on Twitter. As every follower is notified that you have tweeted, a blog publisher can gain lots of exposure for their blog with very little effort.

Once you add Tweetmeme retweets to the mix the spread compounds because not only do you have followers hearing about your tweet but the followers of followers. So say one of your followers retweets your post all that person's followers hear about it too and pretty soon a tweet plus your retweets can popularize a post to the point that it spreads so widely that it goes viral.

Advantages of a Twitter Retweet Button
A Tweet/Retweet button looks similar to and behaves like an integrated Digg button but it counts retweets rather than diggs. A Retweet button counts reposts of a tweet so that readers can see at a glance how popular your article is on Twitter. Another benefit of the Retweet button is that it allows your blog readers to retweet your post so that their followers hear about your post too.

How to Add a Twitter Retweet Button to a Blogger Blog (Blogspot Blog)
The following instructions will place a Tweetmeme Retweet button into all of your blog posts.

  1. Login to Blogger if not already logged in

  2. From the Dashboard navigate to Layout > Edit HTML

  3. Check the Expand Widget Templates button

  4. Back up your Blogger template by clicking on Download Full Template as a precaution

  5. Using CTRL + F find the following code:

    <div class='post-header-line-1'/>

  6. Directly after the above line paste the following code depending on which Retweet button and position you prefer:

      Large Retweet Button - Right Aligned
      Retweet Button
      <div style="float:right;padding:4px;">
      <script type="text/javascript">
      tweetmeme_url = '<data:post.url/>';
      tweetmeme_source = 'your_twitter_user_name';
      </script>
      <script type="text/javascript" src="http://tweetmeme.com/i/scripts/button.js">
      </script> </div>


    • Large Retweet Button - Left Aligned
      Retweet Button
      <div style="float:left;padding:4px;">
      <script type="text/javascript">
      tweetmeme_url = '<data:post.url/>';
      tweetmeme_source = 'your_twitter_user_name';
      </script>
      <script type="text/javascript" src="http://tweetmeme.com/i/scripts/button.js">
      </script> </div>


    • Compact Retweet Button - Right Aligned
      Retweet Compact Button - How to add to Blogger
      <div style="float:right;padding:4px;">
      <script type="text/javascript">
      tweetmeme_style = 'compact';
      tweetmeme_url = '<data:post.url/>';
      tweetmeme_source = 'your_twitter_user_name';
      </script>
      <script type="text/javascript" src="http://tweetmeme.com/i/scripts/button.js">
      </script> </div>


    • Compact Retweet Button - Left Aligned
      Retweet Compact Button - How to add to Blogger
      <div style="float:left;padding:4px;">
      <script type="text/javascript">
      tweetmeme_style = 'compact';
      tweetmeme_url = '<data:post.url/>';
      tweetmeme_source = 'your_twitter_user_name';
      </script>
      <script type="text/javascript" src="http://tweetmeme.com/i/scripts/button.js">
      </script> </div>


  7. Change your_twitter_user_name for your actual Twitter username. For instance I would enter BlogWizz

  8. Click on Save Template

  9. Click on View blog to admire your Tweetmeme Retweet button in your Blogger posts

Tips and Troubleshooting
  • To Add Retweet Button Below Blogger Post
    If you want the button to appear at the bottom of Blogger posts instead of just below the post title locate the first instance of the following code and then paste the code for your chosen button immediately after this line: (don't forget to change your Twitter username as in Step 7)

    <data:post.body/>

  • To Have the Retweet Button Appear on Post Pages Only in Blogger
    If you want the button to only appear on the post pages and not the home page you will need to enclose the button code in an if statement. See below for an example of what the full code would look like with this extra code.

    <b:if cond='data:blog.pageType == "item"'>
    </b:if>

    Thus the full code for a right-aligned large Retweet button which only appears on the individual post pages and not the home page would be:

    <b:if cond='data:blog.pageType == "item"'>
    <div style="float:right;padding:4px;">
    <script type="text/javascript">
    tweetmeme_url = '<data:post.url/>';
    tweetmeme_source = 'your_twitter_user_name';
    </script>
    <script type="text/javascript" src="http://tweetmeme.com/i/scripts/button.js">
    </script> </div>
    </b:if>

In this tutorial you have learned how to add a Tweetmeme Retweet Button to your Blogger posts. The Retweet button will encourage your blog readers to retweet your content on Twitter thereby increasing your blog traffic. I have provided the code for both a large and compact button with the option of left or right alignment. The button appears just below the post title and counts the number of retweets of your Blogger post. I have also included details of how to add the Tweetmeme Retweet button to the foot of your Blogger blog and how to add the button to post pages only.


Related Articles
List of Blog Know How Tutorials for Blogger Blogs
Tips to Add a Digg Button to Blogger Blogspot
Add a Twitter Updates Widget to Blogger
Add Twitter Button or Twitter Badge to Blogger
Add Twitter Followers Counter to Blogger
Add a Social Bookmarking Button to Blogger
Add Social Bookmark Buttons to Blogger
Best Free Social Bookmark Icon Sets for Blogger

Saturday, October 3, 2009

How to Align and Justify Blogger Posts

This is the second article in a series about CSS styling tricks and tips for Blogger written with Blogger beginners and novices in mind but suitable for all bloggers who want to customize their existing Blogger template. While the first article dealt with how to add or remove image borders in Blogger today I show you how to align and justify Blogger posts.
Skill Level: Beginner Rating: Easy Time: 1 Minute

Many of the questions that my readers ask me are about how to customize various features of their Blogger template (Blogspot template). Over the coming weeks I will be focusing on some simple CSS styling tricks and tips to help you get more out of your Blogger template. Much can be achieved by learning a little about CSS. So before you rush off to download a custom Blogger template consider customizing your existing Blogger template.

This tutorial is part of a series of articles that I will publishing over the coming weeks about customizing your Blogger template using CSS styling. I will be targeting beginner bloggers and newbies to Blogger as well as more seasoned bloggers so if you want to spice up your Blogger template please read along.

How to Justify Blogger Posts (Blogspot Posts) Using CSS
It is easy to change the text alignment of your Blogger posts with the addition of one extra line in the CSS styling section of your Blogger template (Blogspot template). By default the alignment is set to left align so that the text aligns to the left while the right edge is ragged. You can also have right alignment where the text aligns to the right and the left edge is ragged.

Another not so common option is to justify the text so that both left and right edges are straight. Users of MS Word and other word processing programs will be familiar with justify as an alignment choice. Justify stretches out the text so that each line has an equal width similar to what you will find in newspapers and magazines. I have found justifying my Blogger posts to be a useful feature on several of my blogs and thought some of you might to. Below are instructions on how to justify your Blogger posts so that all your blog's articles are justified but first take a look at the difference in presentation of these 2 blog posts just by justifying the alignment of the text. Makes a big difference don't you think?

Blogger post text is left aligned
Blogger post text is justified

  1. Before you start check how text is currently aligned on your Blogger posts. If it is left aligned you will be able to follow this trick to justify it. If it is already justified no need to go any further.

  2. Login to Blogger if not already logged in

  3. From the Dashboard click the Layout link for your blog and then click on Edit HTML

  4. Back up your template by downloading it in full as a precaution

  5. Use CTRL + F to find the code block beginning with .post in the CSS styling section of your Blogger template. As templates will differ greatly there are no hard and fast rules about what styling will be in this block. Here is a typical code block taken from the default Minima Blogger template

    .post {
    margin:.5em 0 1.5em;
    border-bottom:1px dotted $bordercolor;
    padding-bottom:1.5em;
    }

  6. Add the following line to the code block before the end brace (the end curly bracket)

    text-align:justify;

    so that your code now looks like:

    .post {
    margin:.5em 0 1.5em;
    border-bottom:1px dotted $bordercolor;
    padding-bottom:1.5em;
    text-align:justify;
    }

  7. Click on Save Template

  8. Click View Blog to see the alignment of all your posts has now changed to justified

Tips and Troubleshooting
  1. If your Blogger template justifies posts and you would like to left align them find the code beginning with .post in your Blogger template and add the following line to the block:

    text-align:left;

    so that your code now looks like:

    .post {
    margin:.5em 0 1.5em;
    border-bottom:1px dotted $bordercolor;
    padding-bottom:1.5em;
    text-align:left;
    }

  2. If you want the posts right aligned you would substitute the word right for left.

In this tutorial you have learned how to justify your Blogger posts to create a straight rather than ragged margin edge. By using this tip to add one line of code to your Blogger template you can enhance the look of your Blogger posts. This tweak only takes a minute but can markedly improve the presentation of your Blogger posts. Please keep reading along for more CSS tips and tweaks in the coming weeks.

Related Articles
List of Blog Know How Tutorials for Blogger Blogs
How to Add, Delete or Remove Blogger Image Borders

Saturday, September 26, 2009

Add a Twitter Updates Widget to Blogger

If you are a regular Twitter user and have a bunch of followers you might want to add a Twitter Updates widget to Blogger (Blogspot). In today's tutorial I will show you the easy way to add a Twitter Updates widget to Blogger (Blogspot). It is fairly straightforward to add this Twitter Updates widget to Blogger so please don't be put off if you are a Blogger beginner as you can have this widget up and running in no time.

If you are new to Twitter and don't have an account yet you can sign up to Twitter for free


Twitter Updates widget for BloggerHow to Add a Twitter Updates Gadget to Blogger
There are several methods of adding a Twitter Updates widget to Blogger which I will be discussing over the next few posts. Today I will start with the easiest method by far. This Twitter widget won't slow down your blog loading time particularly but I suggest as with all HTML widgets that you place it near the bottom of your column of gadgets and limit the number of updates shown.

This Twitter Updates widget will provide a basic widget only and is fine if you aren't too bothered about styling. The widget uses the styling from your blog based on the Blogger template you are using but unfortunately there is no way to modify its appearance at the moment. If you want something a little more fancy keep an eye out for my future posts about Twitter Updates widgets.

  1. Log in to Blogger if you are not already logged in

  2. Go to Layout > Page Elements

  3. Click Add a Gadget in the Blogger sidebar

  4. Click on More Gadgets to the left and choose the Twitter Updates widget. Blogger may change this so if you don't find it there try looking in Featured or Popular.

  5. Enter your Twitter name (usually your blog name)

  6. Choose the number of updates to display. By default this is set to 5

  7. Uncheck display link to your Twitter page if you do not want visitors to go to your Twitter page for some reason otherwise leave it as is.

  8. Click Update to Preview any changes and then Save

  9. Use Blogger's drag and drop feature to reposition your Twitter gadget in the desired location in sidebar or footer of your Blogger blog. Save any changes

  10. Click View Blog to admire your new Twitter Updates widget

In today's tutorial I have shown you how easy it is to add a Twitter Updates widget to your Blogger blog (Blogspot blog). The Twitter Updates widget will display your latest Twitter tweets on your blog. The disadvantage of this third party Twitter Updates widget is that it has basic styling only and no way to modify it. On the plus side it loads fast and is likely to be trouble free. I will be writing more about Twitter updates widgets in the next couple of posts so keep an eye out. Enjoy!


Related Articles
List of Blog Know How Tutorials for Blogger Blogs
Add Twitter Button or Twitter Badge to Blogger
Add Twitter Followers Counter to Blogger

Saturday, September 19, 2009

Blogger Post Image Borders Change or Remove

Sometimes you may want to remove, delete or change the image border of a custom Blogger template or default Blogger template (Blogspot template). In this Blogger tutorial you will learn how easy it is to make changes to your template so that you can get rid of unwanted image borders around all the images that appear in your blog posts or around a single image in a blog post.

You will also learn how to enhance your Blogger template (Blogspot template) by changing the line color and line style of the existing image borders.

Note this Blogger tutorial applies to custom templates and the previous generation of Blogger templates. If you are using the new default Blogger Template Simple please refer to my Blogger tutorial How to Remove the Image Border in Blogger template Simple for instructions

This Blogspot tutorial is rated easy. It involves making minor alterations to your Blogger template (Blogspot template) but this is well within the capabilities of beginner bloggers and newbies. The changes will take less than 5 minutes to complete and can make the world of difference to your Blogger template.

Blogger image with border Blogger image without border

How to Delete, Remove, Get Rid of the Image Border in Blogger Posts
The following instructions will remove the little border around the images in your Blogger posts.

  1. Login into Blogger if not already logged in

  2. From the Dashboard navigate to your blog. Go to Design > Edit HTML by clicking on the Design tab and then choosing the Edit HTML link

  3. Back up your existing Blogger template by clicking on the Download Full Template button

  4. Find the following code in your Blogger template (no need to check the Expand Widgets Template box as we are only working with the CSS Style Sheet). Note: the code in Blogger templates varies but this is the code you will find on a Blogger Minima template and most other default Blogger templates.


    .post img {
    padding:4px;
    border:1px solid $bordercolor;
    }

    If you do not have this code look for the following:

    img{
    padding: 4px;
    border:1px solid $bordercolor;
    }

  5. There are two ways to get rid of the unwanted border image code. You can either:

    • Remove the following line:

      border:1px solid $bordercolor;
      or

    • Change it to the following
      border:0px;

  6. Click on the Save Template button

  7. Click View Blog to admire your post images minus any image border.

How to Change the Color of the Image Border Around Posts in a Blogger Template
The following instructions will show you how to change the color of the border which appears around images in your Blogger posts

  1. Follow Steps 1 to 4 as per removing the image border from Blogger posts.

  2. There are several methods to change the color of the image border but the easiest is to

    • Change the following line:
      border:1px solid $bordercolor;

      to
      border:1px solid #6698FF;

      The above change will make the border line color sky blue. To change the color (in red) to your own color choice replace with the hex color code for your chosen color

  3. Click the Save Template button to save your changes

  4. Click on View Blog to admire the new color around the images in your Blogger posts

Tips and Troubleshooting

  • To change the image border line style from a solid line to a dotted line change the word solid to dotted eg

    border:1px dotted $bordercolor;

  • To change the image border line style from a solid line to a dashed line change the word solid to dashed eg

    border:1px dashed $bordercolor;

  • To increase the width of the image border change the size from 1px to 2px or 3px eg

    border:3px solid $bordercolor;

  • To Remove The Image Border Around Only One Image paste the following into your image code in your Blogger post:

    style="border:none"
    eg
    <img style="cursor:pointer; cursor:hand;width: 126px; height: 22px;" src="http://3.bp.blogspot.com/_vLeiVavkV_M/SrRp2wb1I_I/AAAAAAAAAAA/XXXXXXXXX/s200/download-now.png" border="0" style="border:none" alt=""id="BLOGGER_PHOTO_ID_XXXXXXXXXXXX" />

In this Blogger tutorial you have learned how to remove, delete and get rid of the line border which appears around images in your Blogger posts (Blogspot posts). You have also learned how to change the line color of the border image to your own chosen hex color. In addition I have shown you how to change the line style from solid to dotted or dashed and to remove the border around a single image. As always any problems with making these changes please let me know. Good luck!


Related Articles
List of Blog Know How Tutorials for Blogger Blogs
How to Remove the Image Border in Blogger Simple Template

Tuesday, September 8, 2009

Add 3 Column or 4 Column Footer to Blogger

In this Blogspot tutorial you will learn how to convert your existing Blogger footer (Blogspot footer) into a 3 column footer or a 4 column footer. With more columns in your Blogger footer you will be have the extra room to accommodate more widgets such as Flickr photos and Twitter updates. Also you will be able to put less frequently used widgets such as recents comments, archives, followers, About Me etc at the bottom of your template so that only the most important widgets are loaded first.

This tweak involves adding code to the footer section of your existing Blogger template to change it to 3 columns or 4 columns. The tutorial is not beyond the capabilities of Blogger newbies and webmasters with intermediate skills but care needs to be taken when modifying your Blogger template so back up before you start. For best results a Blogger template with a width of around 900px is best.

Convert your Blogger footer to a 3 column footer

How to Add a 3 Column Footer to Blogger

  1. Log in to Blogger if not already logged in

  2. Navigate to Layout > Page Elements

  3. Move any existing widgets out of the footer section and place them in the sidebar temporarily and save changes

  4. Navigate to Layout > Edit HTML

  5. Back up your template as a precaution by downloading it to your computer

  6. Find the following section in your Blogger template

    <div id='footer-wrapper'>
    <b:section class='footer' id='footer'/>
    </div>

    If you are having difficulty finding this section trying searching for footer-wrap or something similar as sometimes this section is called something else in some templates.

  7. To Add a 3 Column Footer to Blogger
    Replace all the code located in Step 6 with the following

    <div id='footer-columns'>
    <div id='footer1' style='width: 30%; float: left; margin:0; text-align: left;'>
    <b:section class='footer-column' id='col1' preferred='yes' style='float:left;'/>
    </div>
    <div id='footer2' style='width: 40%; float: left; margin:0; text-align: left;'>
    <b:section class='footer-column' id='col2' preferred='yes' style='float:left;'/>
    </div>
    <div id='footer3' style='width: 30%; float: right; margin:0; text-align: left;'>
    <b:section class='footer-column' id='col3' preferred='yes' style='float:right;'/>
    </div>
    <div style='clear:both;'/>
    </div>

    To Add a 3 Column Footer to Blogger with a Lower Footer Section
    Replace all the code located in Step 6 with the following

    <div id='footer-columns'>
    <div id='footer1' style='width: 30%; float: left; margin:0; text-align: left;'>
    <b:section class='footer-column' id='col1' preferred='yes' style='float:left;'/>
    </div>
    <div id='footer2' style='width: 40%; float: left; margin:0; text-align: left;'>
    <b:section class='footer-column' id='col2' preferred='yes' style='float:left;'/>
    </div>
    <div id='footer3' style='width: 30%; float: right; margin:0; text-align: left;'>
    <b:section class='footer-column' id='col3' preferred='yes' style='float:right;'/>
    </div>
    <div style='clear:both;'/>
    <p/>
    <div id='footer-bottom' style='text-align: center; padding: 10px;'>
    <b:section class='footer' id='col-bottom' preferred='yes'>
    </b:section>
    </div>
    <div style='clear:both;'/>
    </div>

    Add 3 column footer to Blogger with a lower section
    To Add a 4 Column Footer to Blogger
    Replace all the code located in Step 6 with the following

    <div id='footer-columns'>
    <div id='footer1' style='width: 25%; float: left; margin:0; text-align: left;'>
    <b:section class='footer-column' id='col1' preferred='yes' style='float:left;'/>
    </div>
    <div id='footer2' style='width: 25%; float: left; margin:0; text-align: left;'>
    <b:section class='footer-column' id='col2' preferred='yes' style='float:left;'/>
    </div>
    <div id='footer3' style='width: 25%; float: left; margin:0; text-align: left;'>
    <b:section class='footer-column' id='col3' preferred='yes' style='float:left;'/>
    </div>
    <div id='footer4' style='width: 25%; float: right; margin:0; text-align: left;'>
    <b:section class='footer-column' id='col4' preferred='yes' style='float:right;'/>
    </div>
    <div style='clear:both;'/>
    </div>

    Convert Blogger Footer to a 4 Column Footer

  8. Save changes to your Blogger template.

  9. Navigate to Layout > Page Elements. You will now see a 3 column footer, 3 column footer with a lower section or a 4 column footer depending on what option you chose.

  10. Move the desired gadgets to the new Blogger footer columns. Create new widgets to fill up the footer columns if necessary. Save your changes.

  11. Click View Blog to admire your new footer section

Tips and Troubleshooting

  1. To Add Padding Between Footer Columns in Blogger
    To create some padding between the columns add the following code to the style section of your Blogger template - before </b:skin> tag.

    #footer-columns {
    clear:both;
    }

    .footer-column {
    padding: 10px;
    }

  2. To Add a Border to the 3 or 4 Column Blogger Footer

    • For Top Border Only of the 3 or 4 Column Footer
      Paste the following code before the </b:skin> tag

      #footer-columns{
      border-top:1px dotted $bordercolor;
      clear:both;
      margin:0 auto;
      }

      Replace $bordercolor with a hex color if default color is not displayed. Change this color to suit your template. For example


      #footer-columns{
      border-top:1px dotted #113355;
      clear:both;
      margin:0 auto;
      }

    • For a Box Border Around the 3 or 4 Column Footer

      #footer-columns{
      border:1px dotted $bordercolor;
      clear:both;
      margin:0 auto;
      }

      Replace $bordercolor with a hex color if default color is not displayed. Change this color to suit your template. For example

      #footer-columns{
      border-top:1px dotted #113355;
      clear:both;
      margin:0 auto;
      }


In today's Blogger tutorial you have learned how to add a 3 column footer or a 4 column footer to your Blogger template (Blogspot template). You have also learned how to add some styling such as a border above the footer and around the footer. As always I am available to answer questions if you need assistance. Good luck!

Related Articles
List of Blog Know How Tutorials for Blogger Blogs
Customize Blogger Tips