By default Blogger creates a link to the image whenever an image is uploaded to a Blogger post. Sometimes, however, you might want to remove the link to prevent the image from being clickable. A common reason would be to safeguard your image. If you are worried about your image being copied you can prevent it from appearing full size by disabling the link.
If you just want to disable the hyperlink from a single image in Blogger try this method. I have found that it removes the link but it will not reinstate it once removed (using the toggle button) so be sure you want to remove the link before you start otherwise you will need to reinstate the link manually. I suggest you backup before you start.
 |
| This image has had the link removed |
- Go to the Blogger Post Editor.
- Ensure you are in Compose mode (toggle between Compose and HTML on the top left corner under your Blog name
- Upload an image in Blogger or use an existing image.
- Highlight the image. You will see it gives you the choice of sizes, to add a caption, remove the image etc.
- While the image is highlighted click on Link from the menu once. This will disable the hyperlink and your image will no longer be clickable.
- Save your changes.
- Go to your live blog and try clicking on your image. Your image will no longer be clickable and you will no longer be able to see a larger view of the image.
Related Articles
List of Blog Know How Tutorials for Blogger Blogs
How to Remove the Image Border in Blogger Template Simple
How to Change or Delete Image Borders in Blogger Posts
In this Blogger tutorial I show you how to remove the border around images in Blogger posts (Blogspot posts) when using one of the latest default Blogger templates Simple or Awesome Inc.
If you are using an older generation Blogger template or a custom template the solutions contained in this article may work for you however it is more likely that you will need to follow the methods to remove image borders outlined in my previous Blogger tutorial Change or Remove Blogger Image Borders (Part 1)
Below I explore two methods of removing or deleting image borders in the Blogger template Simple. The first method shows you how to remove the image border using Template Designer and the second method outlined describes how to remove the image border manually by changing the code.
 Method 1 - Use Template Designer to Remove Image Border in Blogger
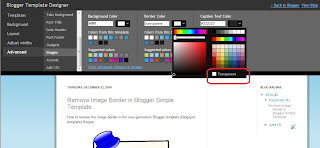
- From the Blogger Dashboard go to Design > Template Designer
- Then select Advanced > Images
- Under Border Color use the drop down arrow to open the color palette
- Change the setting to transparent by checking the small box on the bottom right hand side marked "transparent"
Note: If you are using the black version of the Awesome Inc template you will need to change the Background Color to transparent too. Click on the down arrow of the color palette and select transparent.

- Click Apply to Blog to save your changes to the template
- Navigate to any post page to view images in posts without the border
Method 2 - Change Template Code to Manually Remove Image Border from the New Default Blogger Templates
- From the Blogger Dashboard go to Design > Edit HTML
- Back up your Blogger template
- Find this line amongst the declared variables at the top of your template
<Variable name="image.border.color" description="Border Color" type="color" default="transparent" value="#cccccc"/>
- Change to the value of the border color to transparent like so
<Variable name="image.border.color" description="Border Color" type="color" default="transparent" value="transparent"/>
- Save your changes to the template
- Navigate to any post page that has an image and see that the border around the image is no longer visible
In this Blogger tutorial (Blogspot tutorial) I have shown you how to remove or delete the border around images in Blogger posts for the newest generation of default Blogger templates Simple and Awesome Inc. I have discussed two different methods to remove the border around the images either by adjusting the settings in the Blogger Template Designer or by manually changing the code of the variable in the CSS styling section of the default Blogger template
Related Articles
List of Blog Know How Tutorials for Blogger Blogs
How to Change or Remove Blogger Image Borders (Part 1)
How to Change the Blog Title Border in Blogger Minima Template
How to Add CSS Styling to Blockquotes in Blogger
How to Align and Justify Posts in Blogger
How to Add a Divider Between Blogger Posts
How to Add or Change a Background Image in a Blogger Template
How to Remove the Link from a Single Image in a Blogger Post
In today's Blogger tutorial (Blogspot tutorial) I will show you how to both add a background image to a Blogger template if you don't have one already or change the existing background of your Blogger template.
I have chosen to write this article not because there aren't any how to articles already on the net but because they assume quite a bit of knowledge. I have taken a different tack with this post in that I assume you are an absolute beginner with no knowledge of Blogger templates.
For this reason I have provided some sample backgrounds for you to play around with. By just cutting and pasting these images you can see first hand how dramatically adding a different background to your Blogger template can change it. You will see that replacing your background image with these images isn't that difficult and hopefully it will give the confidence to branch out further and change the background of your Blogger template to suit your own needs. All that is needed is to insert a small snippet of code into the CSS styling section of your Blogger template and hey presto your Blogger template will take on a whole new look.
How to Change the Color of a Blogger Background (Default Templates)
If you are using a default Blogger template then you already have the option to change the background color to your own taste by going to Layout > Fonts and Colors. Some third party custom Blogger templates have this option too but by no means all. For instructions on changing the background color of custom templates see tips and troubleshooting below.
How to Add a Background Image to a Blogger Template
- Log in to Blogger if not already logged in
- Go to Layout > Edit HTML
- Back up your Blogger template as a precaution by downloading the full template to your computer
- Find the following line in your Blogger template
body {
- Add the following line directly after this line
background-image: url(URL address of your image);
Your block of code will now look like this:
body {
background-image: url(URL address of your image);
(existing code in this block)
}
- Now replace the code in red for the URL address of your image. Choose an image from the selection below to practise with or use your own image. Note if using your own image make sure you read the tips and troubleshooting section below.

https://blogger.googleusercontent.com/img/b/R29vZ2xl/AVvXsEih2q4FuC0S4bPaROk3Si7h4KLEY5rs6E_xbNhyoDFpMJ1pWmYwff3IvRWOWN6si7UGPGtfIx8Bs3PqahnwejIg4nkjP04S7UsWwJDcxijmhEUjjVIVKebrh4w4x108ekrbg1bGi14xPE8/s320/background_047.gif

https://blogger.googleusercontent.com/img/b/R29vZ2xl/AVvXsEgt5dmWLoIqPih9KAGsVlSRsBatSw39ncVz48PgUfT1C3r4VI-Sn5UtLG-iC6qULgKNXmlBo2NfdQfFMQtWz6fckxMgGfmG9rRopuprOSDUvH8l2i_KC5NgBExO5eeiCG4efd6hoOeXZMU/s320/background_104.gif

https://blogger.googleusercontent.com/img/b/R29vZ2xl/AVvXsEjE2Nb-dBQ6C_Yvs8gzgHv_rRzes7iuBCgRPSSzZIF_DuANKILIu-KAxtYe3hD3IFpjeD76Ei9bb-DeZsb_52-UP6_1MWU3re2zNcNtvNz6a0F-NlZXC4AG76SGNg6WKHNBvHSQg8cRENM/s320/background_126.gif

https://blogger.googleusercontent.com/img/b/R29vZ2xl/AVvXsEgAtmAaGXuMZIa5GS2H6yRMwwyEIOb-HBp6Ly4F47c2Cu6S38MBeucJFKriUxfDHKgwrGQhdIBQUjnvnYsqEfB6sDmsDFRXCcckqquJTbFcfNIxPzJMvZFiOzWt96LVZsJ6_ZYp63XD8Ps/s320/background_073.gif

https://blogger.googleusercontent.com/img/b/R29vZ2xl/AVvXsEgAs8BOjOaWKV1rHweq29iv7IRHgGrJZoq1ry6_idL9TsOBqf9OpmEAl0fuqJvykpZJPaysc0MuGpXMNYALN5lW1ID_IErn8K6rpWkCz_2IkZ5V-a1nuuBfxvyHmrldrphZBADzymGeV2I/s320/background_083.gif
Green Paws Background

https://blogger.googleusercontent.com/img/b/R29vZ2xl/AVvXsEiqDRGyc-6Ez-u_XtEiLlYpA4PELBQHO-_5xz7WzTlekmTJs9JVm-whanG5Ci_nO3j3TTkvyQ5iY-n97GEiflV2jUcmRCDUnetPVIQHzAZwkm6_3RZOpzu_SujVAtgzc3DCHD0eDQmHiOk/s320/green-paws.gif
Musical Notes Background

https://blogger.googleusercontent.com/img/b/R29vZ2xl/AVvXsEjX34iSoCvPabycFw3NAnjDqaq-1cEtcxyDjSln0ueU4BsajdQuZwfg5uMmHU2QRFVeDFrPooZmduIIPGT3oVSFZ0JptYEG1VkT8cvLKu3n4x7htFO7DchM2dqG1pkoKhSsYLXYbbWXKLY/s320/melody.gif
- Use the Preview button to see the effect of these different backgrounds on your template. It will help you get an idea of the kind of possibilities out there.
- You are welcome to use one of the above Blogger backgrounds as they are all free to use without any restriction. If you decide to use one of these simply click on Save Template and you are in business. Alternatively go ahead and find your own background image on the net and follow the instructions below to insert it into your Blogger template.
Tips and Troubleshooting- To Add Your Own Image to a Blogger Template
There are huge number of backgrounds on the net that are suitable for Blogger. Search under free website backgrounds in your favorite search engine to find these.
Simply download your preferred background and save to an image service like Photobucket, Flickr.
Make sure the file format is either a .jpg, .gif or .png and that its size does not exceed 100kbs. As a rule of thumb an image size of around 30kb or less is about right if loading time speed is not to be compromised. Larger images can be resized quickly by using an online resizing service such as Shrink Pictures.
Follow the instructions above to change the URL to that of your image.
- To Change the Background Color of Your Custom Blogger Template
If there is no option to change the background color of your Blogger template in Layout > Fonts and Colors you can still change the color manually.
- Follow steps 1 to 4 as above
- Find the line beginning with :
background-color: #
- The hex color will be different for each template. We will change the color only
background-color: #change hex color code to your chosen color;
- Replace the existing hex color code with the value of your chosen hex color. List of web safe hex colors. For example insert the following code to change the background color to:
Denim Blue
background-color: #336699;
Black
background-color: #000000;
White
background-color: #ffffff;
- Use the Preview button to see the effect of each color before you save it.
- Once you are satisfied go ahead and click on Save Template
Today's Blogger tutorial (Blogspot tutorial) aimed at Blogger beginners continues the series on CSS styling for Blogger. You have learned how to add the background image to your Blogger template or change the existing background image. To help you gain confidence in changing the background image I have provided some sample images for you to practise with. Also in this Blogger tutorial you have learned how to change the color of your Blogger background if you prefer a plain solid background color rather than a background image. As always if you strike any problems implementing the tips in this tutorial please let me know.
Related ArticlesList of Blog Know How Tutorials for Blogger BlogsHow to Add, Delete or Remove Blogger Image BordersHow to Align and Justify Posts in BloggerHow to Add a Divider Between Blogger Posts
In today's Blogger tutorial I show you how to enhance your Blogger blog (Blogspot blog) by adding a post divider to your Blogger template. Used effectively post dividers can really jazz up your blog and will lend it that individual feel which most of us are hoping to create.
This tweak is very easy and well within the capabilities of any Blogspot blogger. Only a few simple changes to your Blogger template are required and these are in the CSS styling section.

By way of example I will use a divider that I downloaded from the internet free by searching for free divider graphics. Here are some sample dividers you can use to get started:

URL address:
https://blogger.googleusercontent.com/img/b/R29vZ2xl/AVvXsEgB0icfjkH1ytPfsOuVta9fGy8ruK8792q5ww3WMLLVAOgY7vW7kj7faHUlnBQLgltgZAaj_ccKhYXwCHEYqJhyphenhyphensEzPSv7jEsQ7bjYx50WUZGs9xIxDV8oOLo3oDBV0QWZn-eL6tSeEvcg/s400/ribbon.gif

URL address:
https://blogger.googleusercontent.com/img/b/R29vZ2xl/AVvXsEj_hejEcgAo5naB6wW-2gGD4Ex9GtJi1T4PaXHO7GUbhMlHhGxxfPz7pq1aCOJITjf2JVMSF3lC4xXUiumbyiutIrJcqisQ8zzFtFSeqEyIwesa8Mh-aFnE0GayjNfdv64f8mliZ_TYvqw/s400/bar1.gif

URL address:
https://blogger.googleusercontent.com/img/b/R29vZ2xl/AVvXsEgPVmOE9V0fNx4o70tklaOa8exaVHZ16HeHInLJKY29b1Gpl4H1qHDawqKw_5QPyEcvgGkacySiW4jOWDCtQl6jiGv93GsZ1zchkSGdQMkdKKEpEUJlkWyDJ0Ef1qmRYYlYO394119v2cA/s400/barbsmpl.jpg

URL address:
https://blogger.googleusercontent.com/img/b/R29vZ2xl/AVvXsEgeYegENYuO7JQ1dH4MZkTmPxbjih_AEOmxG6BEbxhE-0AV5NzVv2HBCZj8ZHsieNQQJAq7MoLw5QzrR6w9J7_4WyB3hOj7VpmsLJlYviqTCWwLnp_9phx7cV599e3TS7H9Eg1L9TB2BGI/s400/bar47.gifHow to Add a Divider Between Posts in Blogger- Login to Blogger if not already logged in
- From the Dashboard navigate to Layout > Edit HTML
- Back up your Blogger template as a precaution by downloading it to your computer
- Find the following line of code in your template:
.post {
You are likely to have something like this in your template already:
.post {
margin:.5em 0 1.5em;
border-bottom:1px dotted $bordercolor;
padding-bottom:1.5em;
}
- Paste the following lines of code to this block making sure you paste them before the closing curly bracket:
background: url(https://blogger.googleusercontent.com/img/b/R29vZ2xl/AVvXsEgB0icfjkH1ytPfsOuVta9fGy8ruK8792q5ww3WMLLVAOgY7vW7kj7faHUlnBQLgltgZAaj_ccKhYXwCHEYqJhyphenhyphensEzPSv7jEsQ7bjYx50WUZGs9xIxDV8oOLo3oDBV0QWZn-eL6tSeEvcg/s400/ribbon.gif);
background-repeat: no-repeat;
background-position: bottom center;
margin:.5em 0 1.5em;
padding-bottom:1.5em;
- If any lines are duplicated remove them.
- Remove any line beginning with: border-bottom: eg
border-bottom:1px dotted $bordercolor;
- You will now have a block of code which looks like this plus any extra lines from the existing code in this block:
.post {
background: url(https://blogger.googleusercontent.com/img/b/R29vZ2xl/AVvXsEgB0icfjkH1ytPfsOuVta9fGy8ruK8792q5ww3WMLLVAOgY7vW7kj7faHUlnBQLgltgZAaj_ccKhYXwCHEYqJhyphenhyphensEzPSv7jEsQ7bjYx50WUZGs9xIxDV8oOLo3oDBV0QWZn-eL6tSeEvcg/s400/ribbon.gif);
background-repeat: no-repeat;
background-position: bottom center;
margin:.5em 0 1.5em;
padding-bottom:1.5em;
}
- Click on Save Template to save your changes
- Click on View Blog to see your new post divider between posts
Tips and Troubleshooting- To change the divider to one of the above replace the URL address of the image (in red) with the URL address of the new image you want to use.
- To use your own divider image download to your computer from the internet and then save the image to a photo image service like Photobucket. Replace the divider image URL address (in red) with the URL address of your new image
- To increase the padding around the divider change the following line of code:
padding-bottom:1.5em;
to
padding-bottom:2.5em;
In today's Blogger tutorial you have learned how to insert a divider between your Blogger posts to enhance the look of your Blogger template (Blogspot template). You can either make your own post divider or download one from the myriad of free website dividers available on the net.
Related ArticlesList of Blog Know How Tutorials for Blogger BlogsHow to Add, Delete or Remove Blogger Image BordersHow to Align and Justify Posts in Blogger
Sometimes you may want to remove, delete or change the image border of a custom Blogger template or default Blogger template (Blogspot template). In this Blogger tutorial you will learn how easy it is to make changes to your template so that you can get rid of unwanted image borders around all the images that appear in your blog posts or around a single image in a blog post.
You will also learn how to enhance your Blogger template (Blogspot template) by changing the line color and line style of the existing image borders.
Note this Blogger tutorial applies to custom templates and the previous generation of Blogger templates. If you are using the new default Blogger Template Simple please refer to my Blogger tutorial How to Remove the Image Border in Blogger template Simple for instructions
This Blogspot tutorial is rated easy. It involves making minor alterations to your Blogger template (Blogspot template) but this is well within the capabilities of beginner bloggers and newbies. The changes will take less than 5 minutes to complete and can make the world of difference to your Blogger template.

 How to Delete, Remove, Get Rid of the Image Border in Blogger Posts
The following instructions will remove the little border around the images in your Blogger posts.
- Login into Blogger if not already logged in
- From the Dashboard navigate to your blog. Go to Design > Edit HTML by clicking on the Design tab and then choosing the Edit HTML link
- Back up your existing Blogger template by clicking on the Download Full Template button
- Find the following code in your Blogger template (no need to check the Expand Widgets Template box as we are only working with the CSS Style Sheet). Note: the code in Blogger templates varies but this is the code you will find on a Blogger Minima template and most other default Blogger templates.
.post img {
padding:4px;
border:1px solid $bordercolor;
}
If you do not have this code look for the following:
img{
padding: 4px;
border:1px solid $bordercolor;
}
- There are two ways to get rid of the unwanted border image code. You can either:
- Remove the following line:
border:1px solid $bordercolor;
or
- Change it to the following
border:0px;
- Click on the Save Template button
- Click View Blog to admire your post images minus any image border.
How to Change the Color of the Image Border Around Posts in a Blogger Template The following instructions will show you how to change the color of the border which appears around images in your Blogger posts
- Follow Steps 1 to 4 as per removing the image border from Blogger posts.
- There are several methods to change the color of the image border but the easiest is to
- Change the following line:
border:1px solid $bordercolor;
to
border:1px solid #6698FF;
The above change will make the border line color sky blue. To change the color (in red) to your own color choice replace with the hex color code for your chosen color
- Click the Save Template button to save your changes
- Click on View Blog to admire the new color around the images in your Blogger posts
Tips and Troubleshooting- To change the image border line style from a solid line to a dotted line change the word solid to dotted eg
border:1px dotted $bordercolor;
- To change the image border line style from a solid line to a dashed line change the word solid to dashed eg
border:1px dashed $bordercolor;
- To increase the width of the image border change the size from 1px to 2px or 3px eg
border:3px solid $bordercolor;
- To Remove The Image Border Around Only One Image paste the following into your image code in your Blogger post:
style="border:none"
eg
<img style="cursor:pointer; cursor:hand;width: 126px; height: 22px;" src="http://3.bp.blogspot.com/_vLeiVavkV_M/SrRp2wb1I_I/AAAAAAAAAAA/XXXXXXXXX/s200/download-now.png" border="0" style="border:none" alt=""id="BLOGGER_PHOTO_ID_XXXXXXXXXXXX" />
In this Blogger tutorial you have learned how to remove, delete and get rid of the line border which appears around images in your Blogger posts (Blogspot posts). You have also learned how to change the line color of the border image to your own chosen hex color. In addition I have shown you how to change the line style from solid to dotted or dashed and to remove the border around a single image. As always any problems with making these changes please let me know. Good luck!
Related ArticlesList of Blog Know How Tutorials for Blogger BlogsHow to Remove the Image Border in Blogger Simple Template


