In this Blogger tutorial I expand on my previous article about how to add a 3-4 column footer to Blogger by showing you how add border styling to the new footer. You will learn how to add a border around all of your footer columns or around only part of the footer columns. You will also learn how to add different border styles and border colors to customize your 3-4 column footer.
If you have just landed here and need instructions on how to add a 3 or 4 column footer to your Blogger blog then please refer to how to add a 3 or 4 column footer to a Blogger template (Blogspot template)
This is a walkthrough designed to assist bloggers with no experience of CSS styling who want to enhance their Blogger template with borders and other CSS styling. By following these examples you will gain the knowledge you need to make many types of custom changes to the borders of your new Blogger footer. For help with changing the background of your blogger footer please see my article How to Change the Background a Blogger Footer.
How to Add Borders to the Footer of a Blogger Template
To add lines (commonly known as borders) to a Blogger template footer we need to add some CSS styling.
Before beginning to add borders there are 3 values to consider:
- width of the border (line thickness eg 1px, 2px, 3px and so on)
- line style of the border (solid, dotted, dashed, double)
- color of the border (hex color)
- How to Add a Border Around the Outside of a Blogger Footer
First we add the border property and then add the border style, border width and the border color values. In these following examples just by changing these values we can achieve lots of different results.
- To Add a Dashed Border Around the Outside of a Blogger Footer
With the following code a dashed black line 1px thick will be added around the outside of the footer.
#footer-columns {
margin:0 auto;
clear:both;
}
Change to:
#footer-columns {
border: 1px dashed #000000;
clear:both;
margin:0 auto;
}

- To Add a Dotted Border Around the Outside of a Blogger Footer
By changing the dashed black line to a dotted border it is simple to get a different line style.
#footer-columns {
clear:both;
margin:0 auto;
}
Change to:
#footer-columns {
border: 1px dotted #000000;
clear:both;
margin:0 auto;
}

- To Add a Solid Border (Blue 3px thick) Around the Outside of a Blogger Footer
To add extra emphasis we can change the line color and its thickness. Here I have made the line blue rather than black and thickened it from 1px to 3px.
#footer-columns {
clear:both;
margin:0 auto;
}
Change to:
#footer-columns {
border: 3px solid #336699;
clear:both;
margin:0 auto;
}

- To Add a Partial Border to a Blogger Footer
Sometimes we might want to add a border to only one part of the footer area rather than the whole thing. Again we add the border property but we append it with the following values: (top, bottom, left, right) depending on where we want to place the border.
- To Add a Solid Border to the Top of a Blogger Footer
#footer-columns {
clear:both;
margin:0 auto;
}
Change to:
#footer-columns {
border-top: 1px solid #000000;
clear:both;
margin:0 auto;
}

- To Add a Solid Border to the Bottom of a Blogger Footer
#footer-columns {
clear:both;
margin:0 auto;
}
Change to:
#footer-columns {
border-bottom: 1px solid #000000;
clear:both;
margin:0 auto;
}
- To Add a Dashed Border to the Top of a Blogger Footer
#footer-columns {
clear:both;
margin:0 auto;
}
Change to:
#footer-columns {
border-top: 1px dashed #000000;
clear:both;
margin:0 auto;
}
- To Add a Dotted Border to Both Top and Bottom of a Blogger Footer
#footer-columns {
clear:both;
margin:0 auto;
}
Change to:
#footer-columns {
border-top: 1px dotted #000000;
border-bottom: 1px dotted #000000;
clear:both;
margin:0 auto;
}
- To Add a Dotted Border 4px thick to Both Top and Bottom of a Blogger Footer
#footer-columns {
clear:both;
margin:0 auto;
}
Change to:
#footer-columns {
border-top: 4px dotted #000000;
border-bottom: 4px dotted #000000;
clear:both;
margin:0 auto;
}

- To Add a Blue Solid Border 5px thick to Both Top and Bottom of a Blogger Footer
#footer-columns {
clear:both;
margin:0 auto;
}
Change to:
#footer-columns {
border-top: 5px solid #336699;
border-bottom: 5px solid #336699;
clear:both;
margin:0 auto;
}
In this Blogger tutorial (Blogspot tutorial) I have shown you how to make some simple customizations to the borders of a Blogger footer. This tutorial is intended as an extension of my earlier tutorial on adding a three or four column footer to Blogger. However it is also suitable if you are using a custom template and want to enhance the footer styling further. You have learned how to add borders to a Blogger footer and change the position, color, width and styling.
If you want to know more about CSS styling I will be publishing further articles in the future. Look out for my next article in this series How to Add Backgrounds to a Blogger Footer.
Related ArticlesList of Blog Know How Tutorials for Blogger BlogsHow to Add a 3 or 4 Column Footer to a Blogger Template
In this Blogger tutorial (Blogspot tutorial) you will learn how to add a comments counter button to Blogger (Blogspot) to show off the number of comments each of your posts has received.
A comment counter button (bubble) will have the effect of encouraging visitors to comment on your Blogger blog and also help to highlight the credibility of your articles.

Installing this Blogger hack to add a comment counter button only takes a few minutes. The changes needed to add the comment bubble to Blogger while not difficult do involve adding a small snippet of code to your Blogger template in two places. For this reason I strongly urge you to back up your Blogger template before attempting this blogger hack.
Blogger Tutorial Difficulty - easy to medium
How to Add a Comments Counter Bubble to BloggerA Step-by-Step WalkthroughThe following steps will insert a fully clickable comments counter button on the same line as the post title in Blogger. The comments counter is right aligned by default.
- Log in to Blogger and the blog you wish to apply these changes to
- Select Design > Edit HTML
- Click on Download Full Template to back up your template before you make any changes
- Check the Expand Widget Templates box
- In the CSS Styling section of your Blogger template and just before the ]]></b:skin>
.comments-button {
width : 48px;
height : 48px;
background : url(https://blogger.googleusercontent.com/img/b/R29vZ2xl/AVvXsEhOAtKzKSu1isk_ogKXQ_AjufJKPdBZMhkA9aWct6HpXPlvKNUli1ZVovL62YABdIvpbrlPbslmPSlUG2KJcmwJeLFwt-LDPQQGF2lehA-5MmT2ZuyMB38il5UwmdhdHQ9jsaTysJljwFKE/s200/comment-counter-bubble.png) no-repeat;
float : right;
font-size : 18px;
margin-top : -15px;
margin-right : 2px;
text-align : center;
padding-top:10px;
}
- Now find the following block of code using CTRL key + F
<b:includable id='post' var='post'>
<div class='post hentry uncustomized-post-template'>
<a expr:name='data:post.id'/>
<b:if cond='data:post.title'>
<h3 class='post-title entry-title'>
<b:if cond='data:post.link'>
<a expr:href='data:post.link'><data:post.title/></a>
- Copy this code block:
<b:if cond='data:post.allowComments'>
<a class='comments-button' expr:href='data:post.addCommentUrl' expr:onclick='data:post.addCommentOnclick'><data:post.numComments/></a>
</b:if>
- Insert as follows:
<b:includable id='post' var='post'>
<div class='post hentry uncustomized-post-template'>
<a expr:name='data:post.id'/>
<b:if cond='data:post.title'>
<h3 class='post-title entry-title'>
<b:if cond='data:post.allowComments'>
<a class='comments-button' expr:href='data:post.addCommentUrl' expr:onclick='data:post.addCommentOnclick'><data:post.numComments/></a>
</b:if>
<b:if cond='data:post.link'>
<a expr:href='data:post.link'><data:post.title/></a>
- Save template and then view blog to admire your new comment counter badge.
Tips and Troubleshooting- If you prefer you can replace the button image I have provided with your own image. You can find other buttons easily enough by doing a Google search with a term like "speech button icons".
 Upload your button to a hosting service such as Photobucket and change the URL address of the image in the CSS styling section. The following example will render a smaller blue button. Note I have reduced the font size to accommodate the change. You may need to play around with the settings to get the font sizing right for your image.
.comments-button {
width : 48px;
height : 48px;
background : url(https://blogger.googleusercontent.com/img/b/R29vZ2xl/AVvXsEjBCESuDqVaLeY9cdRLRXZ2N-VaHdnk7CT23nyCgCkLW-0fcwu3iXiYF3supJppw7Qb_XuiF2Z-McJQal8udJl7ND0PlzSBHjrY-TH-bxacOTkmaJ8mzuSz7MJq9gI4oQ9Hx2mnKTbgj87e/s200/comment-counter-bubble-2.png) no-repeat;
float : right;
font-size : 14px;
margin-top : -15px;
margin-right : 2px;
text-align : center;
padding-top:10px;
}
- If you want your comment counter to be left aligned instead of right you will need to change the CSS styling from float:right; to float:left;
In today's Blogger tutorial I have covered how to add a comments counter to a Blogger blog (blogspot blog) that will appear to the right of your blog post title. A comments counter is a way to encourage visitors to comment and is a way of showing off the credibility of your blog posts. Good luck! Any comments about installing this blogger hack are most welcome.
Related ArticlesList of Blog Know How Tutorials for Blogger BlogsTips to Add Digg Button to Blogger BlogspotAdd Twitter Followers Counter to BloggerAdd Twitter Badge or Button to BloggerAdd a Social Bookmarking Button to BloggerAdd Social Bookmark Buttons to Blogger
In this Blogger tutorial I show you how to remove the border around images in Blogger posts (Blogspot posts) when using one of the latest default Blogger templates Simple or Awesome Inc.
If you are using an older generation Blogger template or a custom template the solutions contained in this article may work for you however it is more likely that you will need to follow the methods to remove image borders outlined in my previous Blogger tutorial Change or Remove Blogger Image Borders (Part 1)
Below I explore two methods of removing or deleting image borders in the Blogger template Simple. The first method shows you how to remove the image border using Template Designer and the second method outlined describes how to remove the image border manually by changing the code.
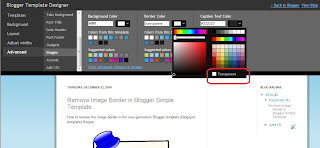
 Method 1 - Use Template Designer to Remove Image Border in Blogger
- From the Blogger Dashboard go to Design > Template Designer
- Then select Advanced > Images
- Under Border Color use the drop down arrow to open the color palette
- Change the setting to transparent by checking the small box on the bottom right hand side marked "transparent"
Note: If you are using the black version of the Awesome Inc template you will need to change the Background Color to transparent too. Click on the down arrow of the color palette and select transparent.

- Click Apply to Blog to save your changes to the template
- Navigate to any post page to view images in posts without the border
Method 2 - Change Template Code to Manually Remove Image Border from the New Default Blogger Templates
- From the Blogger Dashboard go to Design > Edit HTML
- Back up your Blogger template
- Find this line amongst the declared variables at the top of your template
<Variable name="image.border.color" description="Border Color" type="color" default="transparent" value="#cccccc"/>
- Change to the value of the border color to transparent like so
<Variable name="image.border.color" description="Border Color" type="color" default="transparent" value="transparent"/>
- Save your changes to the template
- Navigate to any post page that has an image and see that the border around the image is no longer visible
In this Blogger tutorial (Blogspot tutorial) I have shown you how to remove or delete the border around images in Blogger posts for the newest generation of default Blogger templates Simple and Awesome Inc. I have discussed two different methods to remove the border around the images either by adjusting the settings in the Blogger Template Designer or by manually changing the code of the variable in the CSS styling section of the default Blogger template
Related Articles
List of Blog Know How Tutorials for Blogger Blogs
How to Change or Remove Blogger Image Borders (Part 1)
How to Change the Blog Title Border in Blogger Minima Template
How to Add CSS Styling to Blockquotes in Blogger
How to Align and Justify Posts in Blogger
How to Add a Divider Between Blogger Posts
How to Add or Change a Background Image in a Blogger Template
How to Remove the Link from a Single Image in a Blogger Post
In this Blogger tutorial I discuss how to change the blog title border color or remove the border in a Blogger template (Blogspot template) by changing either the CSS styling of the border manually or by using the Blogger Template Designer feature.
Lots of bloggers have updated their Blogger template to the new default series of Blogger templates for 2010. There are however many of you who are still using the default Minima template from 2006 (and there are lots of good reasons to do so) so this tutorial is for you and anyone else who is using a custom Blogger template based on Minima.
You will learn how to change the border styling around the blog title to suit your individual requirements. You can either change the border color or remove the border altogether. If you want to remove the border around images in Blogger posts (Blogspot posts) then please refer to my Blogger tutorial How to Add, Change or Remove the Border Image in Blogger Posts
Remove or Change the Blog Title Border in Blogger (Blogspot)
There are two simple ways to remove the border around the blog title in Blogger. We are going to hide the border rather than actually remove the code that creates it by making the border color transparent. I will also show you how to change the border color.
Method 1 discusses how to do this using the Blogger Template Designer while Method 2 describes how to change the blog title border manually by changing the code.

Method 1 - Using Blogger Template Designer
- Log in to Blogger
- From the Dashboard go to Design > Template Designer
- Go to Templates > Advanced > Border Color

- Choose the down arrow color picker to activate the color palette window
- Choose transparent which is below the color palette to remove the border around the blog title completely. You now will see the blog title border disappear. Or choose a new color from the color palette to change the color
 Remove Blog Title Border
 Change Blog Title Border Color
- Click on Apply to Blog to save your changes
Method 2If the Blogger Template Designer is not working on your template for some reason you can tweak the code in your template to remove the border around the blog title
- Log in to Blogger
- From the Dashboard go to Design > Edit HTML
- Back up your Blogger template
- Find the border color variable which will be near the top of the template code

- Change the border color value to transparent to remove the border altogether so that your code now looks like this:
<Variable name="bordercolor" description="Border Color"
type="color" default="#ccc" value="transparent">
or change the value to a color of your choice eg
<Variable name="bordercolor" description="Border Color"
type="color" default="#ccc" value="#ff7f00">
- Save your template and view your blog to see that the border around the blog title has been removed or changed color

Tips and TroubleshootingBelow are some tips to help you further customize the blog title border width. You can either remove the inner border, thicken the outer border or thicken both borders around the blog title in Blogger.
- To change the width of the border around the blog title in Minima change the following:
#header {
margin: 5px;
border: 1px solid $bordercolor;
text-align: center;
color:$pagetitlecolor;
}
to
#header {
margin: 5px;
border: 10px solid $bordercolor;
text-align: center;
color:$pagetitlecolor;
}
This code increases the border width from 1px to 10px
- To remove the inner border around the blog title in Minima change the code to the following:
#header {
margin: 5px;
border: 10px solid $bordercolor; (remove this line)
text-align: center;
color:$pagetitlecolor;
}
- To increase the width of the outer border around the blog title in Minima change this code
#header-wrapper {
width:660px;
margin:0 auto 10px;
border:10px solid $bordercolor;
}
In this Blogger tutorial you have learned two methods to change the color of the border around a blog title in Blogger blog (Blogspot blog). I have also shown you how to increase the size of the border width. This tutorial applies particularly to the default Blogger template Minima but also is relevant for any blogger using a custom Blogger template based on Minima. Good luck!
Related ArticlesList of Blog Know How Tutorials for Blogger BlogsHow to Add CSS Styling to Blockquotes in BloggerHow to Add, Delete or Remove Blogger Image BordersHow to Align and Justify Posts in BloggerHow to Add a Divider Between Blogger PostsHow to Add or Change a Background Image in a Blogger Template


