BlogKnowHow apologies for the technical problems with the site. We are working on it and hope to resolve the issue as soon as possible.

Thursday, February 26, 2009

Submit Your Blogspot Sitemap to Yahoo

Yahoo Site Explorer Add My Site page
One of the most important ways to attract traffic to your site is to ensure that your Blogger (Blogspot) blog is properly indexed by popular search engines such as Yahoo. If you want to increase your chances of having your site quickly indexed by the Yahoo search engine it pays to submit your site and your feed. In this tutorial we will be covering the process of signing up with Yahoo, authenticating your site and adding your site feed to Yahoo Site Explorer.

Yahoo can be notoriously slow at indexing and will not necessarily include all crawled pages in its search results. For guaranteed inclusion you can opt for a paid service but if you follow the steps below you have a good chance of having your Blogger blog properly indexed relatively quickly and without any cost.

1. Sign up for a free Yahoo Account if you don't already have one.

2. Sign in to Yahoo Site Explorer where you will be taken to the MySites page.

3. Submit your Blogger website by entering the URL of your blog and then clicking on the Add My Site button.

Yahoo Site Explorer Add My Site
4. You will now see your website address included in the site list. The 3 columns to the right contain information about feeds, actions, and status. You will notice that the status of your site will be set to new (represented by a yellow circle). Click on the link to your site or click the Explore button.

5. You will be taken to the results page and should get a message like the one pictured below.

Yahoo site Explorer Results Page
6. From the menu on the left click on the Authentication

7. You will be presented with 2 authentication options. Choose Add a META Tag from the dropdown menu then copy the code provided using Ctrl + C.

8. In a new window of your browser login to your Blogger blog. Keep the window of Site Explorer open as we will be returning.

9. Navigate to Layout > Edit HTML in your Blogger (Blogspot) blog

10. When you arrive at the Template page it is a good idea to make a backup of your site's template as a precaution. Go ahead and download it your computer by clicking on the Download Template link. Remember if you inadvertently overwrite some code you may not be able to restore your template so it is worth taking an extra few moments to do this step.

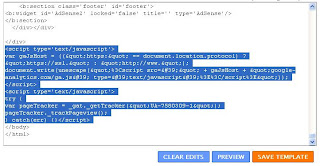
11. Once you have backed up your site locate the Head tag. It will be only a few lines of code down from the top. Now insert the copied code from Yahoo in the position suggested as shown in the picture below using the Ctrl + V command.

Blogger Template Head Tag
12. Once you have pasted the code into the template there is still one further action needed. You will need to add a trailing slash at the end of the new line of code to avoid getting a parse error. Once you have added the trailing slash and are certain you have placed the code in the correct position go ahead and click on the Save Template button.

add yahoo meta tag to blogger template
13. Return to Yahoo Site Explorer and follow the mysite link. You will see that the status of your site has been verified and is represented by a green checkmark.

14. From the lefthand menu select Feeds. You will be taken to the feeds page where you can go ahead and add a feed for your blog by entering the URL of the feed. Notice in the example below I have set an extra parameter to handle redirection of the feed by services such as Feedburner.

Add a Feed to Yahoo
15. Once the feed has been accepted it takes around 24 hours before it is active. After this time and provided there are no errors Yahoo displays "processed" followed by a green tick as can be seen in the picture below.

Yahoo Feed Confirmation
You have now completed the steps involved in having your Blogger (Blogspot) blog crawled and indexed by Yahoo. All that is left to do is to check back periodically to see if Yahoo has indexed your pages. This process can take time so don't expect overnight results. However once Yahoo recognises your feed your pages will be regularly crawled and any updates in content indexed. The process of adding a feed and verifying your site will have gone a long way towards ensuring your site is included in Yahoo search engine results.

Tips for Adding Blogger Blog to Yahoo Site Explorer
Tips for Submitting Your Blogger Blog to Yahoo
Yahoo Search Engine Optimisation for Blogspot Bloggers
SEO For Blogger Blogs with Yahoo
Faster indexing of your Blogger Blog by Yahoo
How to Ensure Your Blogger Blog is Indexed by Yahoo
Speed Up Indexing of Your Blogger Blog by Yahoo
Yahoo Search Engine and Blogger Blogs

In this tutorial you have learned how to submit your Blogger (Blogspot) blog to Yahoo Site Explorer by authenicating your site and adding a feed which Yahoo can use as a sitemap to improve its indexing of your pages.

Submit Your Blogspot Blog to Yahoo

Yahoo Site Explorer Add My Site page
One of the most important ways to attract traffic to your site is to ensure that your Blogger (Blogspot) blog is properly indexed by popular search engines such as Yahoo. If you want to increase your chances of having your site quickly indexed by the Yahoo search engine it pays to submit your site and your feed. In this tutorial we will be covering the process of signing up with Yahoo, authenticating your site and adding your site feed to Yahoo Site Explorer.

Yahoo can be notoriously slow at indexing and will not necessarily include all crawled pages in its search results. For guaranteed inclusion you can opt for a paid service but if you follow the steps below you have a good chance of having your Blogger blog properly indexed relatively quickly and without any cost.

1. Sign up for a free Yahoo Account if you don't already have one.

2. Sign in to Yahoo Site Explorer where you will be taken to the MySites page.

3. Submit your Blogger website by entering the URL of your blog and then clicking on the Add My Site button.

Yahoo Site Explorer Add My Site
4. You will now see your website address included in the site list. The 3 columns to the right contain information about feeds, actions, and status. You will notice that the status of your site will be set to new (represented by a yellow circle). Click on the link to your site or click the Explore button.

5. You will be taken to the results page and should get a message like the one pictured below.

Yahoo site Explorer Results Page
6. From the menu on the left click on the Authentication

7. You will be presented with 2 authentication options. Choose Add a META Tag from the dropdown menu then copy the code provided using Ctrl + C.

8. In a new window of your browser login to your Blogger blog. Keep the window of Site Explorer open as we will be returning.

9. Navigate to Layout > Edit HTML in your Blogger (Blogspot) blog

10. When you arrive at the Template page it is a good idea to make a backup of your site's template as a precaution. Go ahead and download it your computer by clicking on the Download Template link. Remember if you inadvertently overwrite some code you may not be able to restore your template so it is worth taking an extra few moments to do this step.

11. Once you have backed up your site locate the Head tag. It will be only a few lines of code down from the top. Now insert the copied code from Yahoo in the position suggested as shown in the picture below using the Ctrl + V command.

Blogger Template Head Tag
12. Once you have pasted the code into the template there is still one further action needed. You will need to add a trailing slash at the end of the new line of code to avoid getting a parse error. Once you have added the trailing slash and are certain you have placed the code in the correct position go ahead and click on the Save Template button.

add yahoo meta tag to blogger template
13. Return to Yahoo Site Explorer and follow the mysite link. You will see that the status of your site has been verified and is represented by a green checkmark.

14. From the lefthand menu select Feeds. You will be taken to the feeds page where you can go ahead and add a feed for your blog by entering the URL of the feed. Notice in the example below I have set an extra parameter to handle redirection of the feed by services such as Feedburner.

Add a Feed to Yahoo
15. Once the feed has been accepted it takes around 24 hours before it is active. After this time and provided there are no errors Yahoo displays "processed" followed by a green tick as can be seen in the picture below.

Yahoo Feed Confirmation
You have now completed the steps involved in having your Blogger (Blogspot) blog crawled and indexed by Yahoo. All that is left to do is to check back periodically to see if Yahoo has indexed your pages. This process can take time so don't expect overnight results. However once Yahoo recognises your feed your pages will be regularly crawled and any updates in content indexed. The process of adding a feed and verifying your site will have gone a long way towards ensuring your site is included in Yahoo search engine results.

Tips for Adding Blogger Blog to Yahoo Site Explorer
Tips for Submitting Your Blogger Blog to Yahoo
Yahoo Search Engine Optimisation for Blogspot Bloggers
SEO For Blogger Blogs with Yahoo
Faster indexing of your Blogger Blog by Yahoo
How to Ensure Your Blogger Blog is Indexed by Yahoo
Speed Up Indexing of Your Blogger Blog by Yahoo
Yahoo Search Engine and Blogger Blogs

In this tutorial you have learned how to submit your Blogger (Blogspot) blog to Yahoo Site Explorer by authenicating your site and adding a feed which Yahoo can use as a sitemap to improve its indexing of your pages.

Saturday, February 21, 2009

Track Visitors to Your Blogger Blog

A tracking and statistics program is a necessary tool for anyone wishing to build a profitable blog. It will show you useful information about how people found your blog, keywords they used to find it and how long they stayed.

There are a number of analytics programs that are available for use with your Blogger (Blogspot) blog. Three popular free options are:

Google Analytics (up to five million page views per month)
Site Meter (starting at 25K pageviews)
Stat Counter (up to 500 pageview log/250K pageviews/monthly)

While each of these have certain limitations any of these will give you access to invaluable data about traffic to your Blogger blog.

Advantages of Tracking Visitors to Your Site
There are a number of advantages of tracking visitors to your site.

Firstly you will get a clear understanding of the demographics of your site traffic including information like geographical location and length of visits. This kind of information is useful for targeting content to meet the specific needs of your visitors age groups, lifestyles etc. It will enable you to extend your reach and tap into a larger target audience.

Another advantage is that as your site grows you will have the ability to identify trends. An analytics program will provide a snapshot view of the results of different strategies you might employ, the success of posts and of additions like social bookmarking and networking, stumbles and diggs. You will be able to determine the rate of increase in traffic and identify areas where you could improve for instance by targeting specific keywords.

Without this kind of information it is difficult to gauge the performance of your site. If you are interested in growing your site and I am sure you are then you will find access to analytics invaluable in determining where to put your energies. If you decide to sell your site further down the track you will need hard evidence about the level of traffic your site receives.

How to Add Analytics to Your Blogger Blog?
To add a tracking and statistics to your Blogger blog you will need to place a code block in your template. This is a relatively straightforward process. For a step by step tutorial of how to add Google Analytics to Your Blogger blog see my previous article Add Google Analytics to Your Blogger Blog.

This article has covered the advantages and benefits of adding a statistics and tracking program to your Blogger blog. An analytics program will help you track visitors to your blog and understand traffic trends. Grow your Blogger (Blogspot)site today by adding a free tracking and statistics program such as Google Analytics, Site Meter or Stat Counter.

Related Articles
Add Google Analytics to Your Blogger Blog
Add a Feedjit Live Traffic Feed to Your Blogger Blog

Embed a Comment Form in Your Blogger Posts

Blogger recently extended the functionality of Blogger.com blogs by including the option to embed the comment form into your Blogger posts. If this feature is enabled the comment form is placed at the bottom of the page for each post rather than on a separate Blogger page. This means that readers of your blog can post a comment immediately rather than having to navigate to a new page.

Advantages of Embedding the Comment Form
Apart from making it more convenient for readers to comment there are other benefits to enabling the Embed Comments Form feature.

Once enabled you can choose your desired profile when commenting. You have the choice of your Google account, OpenID, Name/URL and all of the settings previously available when using a pop-up or full page comment form.

Blogger Embed in Posts Comments Form

If you are logged on at Blogger using your Google Account you can also subscribe to comments via email by clicking the Subscribe by Email link. It is not necessary to post a comment in order to subscribe.

How to Embed the Comment Form in Your Blogger Blog
To enable the embedded comment form in your blog go to the Settings menu and click on the Comments link. On the Comments page you will see the option to change the Comment Form Placement setting. Select Embedded Below Post and then Save Your Settings. Visit your site and click on a post to view the new comments form in action.

Blogger Comment Form Placement - Select Embedded Below Post

This tutorial discusses the advantages of embedding a comment form below each post and how to enable this feature in Blogger (Blogspot) in the Settings > Comments menu. If you have downloaded a custom template and find this feature is not working please see my tutorial on how to add an embedded comment form to a Blogger template.

Related Articles
Add Missing Embedded Comments Form to Blogger

Add Google Analytics to a Blogger Blog

If you are new to blogging at Blogger.com you might not be aware that tracking and statistics software can be linked to your site to give you details about your visitors. The process of adding a free tracking program such as Google Analytics is relatively straightforward. By following the simple steps below you will gain access to very useful data about the kind of traffic accessing your site. This will help you grow your site and target your content to meet the needs of your visitors.

Steps to Add Google Analytics to Your Blogger Blog

1. Login to Google Analytics
Login to Google Analytics at http://google.com/analytics with your Blogger.com login. If for some reason you wish to create a new account you can do so but be aware that you will lose the advantages of accessing other Google services such as Google Webmaster Tools and Google Adsense without having to log out.

2. Sign Up to Google Analytics
Click on the Sign Up button and you will be taken to the Analytics - New Account Signup page. Enter your blog URL, account name, country, and time zone on this page.

URL
The URL of this blog is blogknowhow.blogspot.com

You would enter nameofyourblog.blogspot.com

Account Name
It is a good idea to choose a general name such as Mike's Account because this will be the account name for anything from 1 to 100 websites.

Click on Continue.

In the next screen you will be prompted to enter your personal details: your name, phone number and country. Complete these and click on Continue.

The final sign up page is the Terms of Agreement screen. Once you agree to these your sign up is complete.

3. Copy the Code Block
After completing the signup process Google Analytics provides you with a code block of javascript to be added to your site.

To copy the code highlight the code block and use the command Ctrl + C to quickly copy the code to the clipboard of your computer. Leave the window open as you are going to return there.

4. Login to Blogger.com at http://www.blogger.com/
In a new window login to your site at Blogger.com and navigate from the Dashboard to the Layout tab.

5. Navigate to Edit HTML in the Layout Menu
From the Layout menu select the Edit HTML link (third from the left after Page Elements and Font and Colors). You are going to be adding a little bit of code to your template so care needs to be taken here not to overwrite any existing code. As a precaution it is advisable to backup your template at this point. You will see the option to do so.

6. Add Code Block to Your Blogger Template
To add the code block to your template you will need to locate the code that closes the body tag. This will be very near the bottom of the template. You will need to paste the code block immediately before the tag.

Add Google Analytics Code to Your Blogger Template
To paste the code block position the cursor in front of the tag and use the command Ctrl + V. Once the code is placed in your template and you are sure it is positioned correctly click on Save Template. All going well you have now successfully added Google Analytics to your Blogger blog.

7. Return to Google Analytics
Go back to the Google Analytics window. On the Overview page you will see details about your blog such as Reports, Status, Visits etc. If there is a tick in the status column your Analytics code is working correctly. The screen should look something like the one pictured below.


Google Analytics Overview Page
If the Status contains a yellow triangle symbol with an exclamation mark inside don't despair it just means that Google has not yet updated details of your site. Check back in 24 hours as it can take Google sometime from installing the code to actually providing reports.

Once Google Analytics is successfully receiving data about your site you can begin to make use of the wealth of information at your fingertips.

8. Troubleshooting
If after a day the status still displays a yellow triangle you may need to troubleshoot. A yellow triangle is displayed when the code is not detected or not verified.

Check your Blogger template to ensure the code block is pasted in the correct position.

Further help:
You will find excellent help from Google Analytics at http://www.google.com/support/analytics/.

For details about why Google Analytics is not able to track your site check out
http://www.google.com/support/analytics/bin/answer.py?hl=en_US&answer=57053&utm_id=ad

Friday, February 20, 2009

How to Create Search Engine Friendly Permalinks for Blogger Posts

What are Permalinks?
Permalinks are the permanent links to a post page. Blogger automatically generates a permalink based on the title of your post. Permalinks provide information to the viewer about the kind of content being pointed to.

Permalinks create permanent links to your Blogger posts which are indexed by search engines such as Google. Search engines use permalinks to categorise posts. Browsers use permalinks to help navigate to your posts. When you hover over a permalink in your browser you can read the post name in the status bar.

The permalink for this article is:

http://blogknowhow.blogspot.com/2009/02/improved-permalinks-for-blogger-posts


Permalink View in Browser

Tips for Working With Permalinks in Blogger
While other blogging software such as Wordpress allows the user to edit permalinks Blogger has no such feature. For this reason care needs to be taken when creating titles for your posts as the permalink generated from the title can't be changed later. While your article is in draft form you can continue to change the title as many times as you like. However, once the permalink is assigned at the point that the post is published it remains the same no matter how many times you change the title of your post.

Another issue with Blogger is that it takes only the first 35-40 characters of your title to create the permalink so if you have a longer title you can run into problems. My suggestion is that you design your titles carefully if you want to avoid losing the end characters from your permalink. For instance a long title such as the one below would result in a shortened permalink which would lose the important fact that this post is related to working with Blogger:

http://blogknowhow.blogspot.com/2009/01/how-to-create-user-friendly-permalinks-for-blogger-posts

Fortunately there is a way around this problem. You will need to publish and then republish as I did with this post. The method involves creating a shorter title that will adequately summarise the content of your post (eg Improved Permalinks for Blogger Posts) and then publishing your post. Now go back and change the title to the one you prefer. In this case I changed the title to "How to Create User Friendly Permalinks For Your Blogger Posts." Now your title can be as long as you like. As you can see mine is longer than 40 characters. The permalink, however has remained the same even though the title has changed.

You can use this trick to create eye catching and memorable titles. It will also ensure that the permalink reflects a concise title and that unnecessary details in the permalink are removed. Creating concise permalinks is important for Search Engine Optimisation. Read more about Search Engine Optimisation in the blog tutorial Tips for Search Engline Optimisation.

Related Articles
List of Blog Know How Tutorials for Blogger Blogs
Adjust Blogger Title Tags for Improved SEO

Create a Free Blogspot Blog with Blogger

Blogger.com Create a Blog Page
Blogging has never been easier and thanks to Blogger.com it is absolutely free. You can create a Blogspot blog about virtually anything you like and take advantage of this powerful blogging software.

Some of the Main Features of Blogger.com

Simple user-friendly interface
Use a blogspot subdomain or your own domain name
No restrictions on bandwidth
Unlimited video storage using YouTube
Photo storage using Picasa Web Album (1 GB)
Support for Mobile blogging


How Do I Get an Account at Blogger.com?
Anyone can sign up at Blogger.com. If you already have a Google account (eg gmail email address) you will find the process of signing up to Blogger.com very easy since Google owns the Blogger platform. The advantage of using your existing Google account is that you can gain instant access to many other Google Services such as Picasa Web Albums, Adsense, Google Reader and Webmaster Tools while you are signed in. If you don't yet have a gmail account you can apply for one at gmail.com. Should you wish to use you own email address you can do so but you will forfeit the advantage of immediate access to Google's network of tools and resources.

Once you have a Google account you are ready to sign on at Blogger.com. Simply direct your browser to Blogger.com and click on the "Create an Account" button.

Setting Up an Account at Blogger.com
Setting up your blog is a 3 step process: creating an account, naming your blog and choosing a template. You will be prompted for a name which you will use to sign all of your blog posts. As you will see your email address becomes your account name. Once you have created an account you will be free to create as many blogs as you wish using the one account.

Create an Account
Naming your blog requires some thought. Choose a name that is short, memorable and is associated with your blog theme. Long names are difficult to remember and are therefore best avoided.

The next choice you will be asked to make is to select a template. This can be changed at a later date so don't worry if you are uncertain about your choice at this stage. Choose the template that most closely resembles the look and feel of the site you wish to create.

Configuring Blogger.com Settings

Basic Settings
Before launching into your first post you will need to set up a few blog settings. From the "Settings" tab click on the "Basic" link and enter the blog title you wish to use and a short description of your site on the page which appears. Save these settings by clicking on the button at the bottom of the page.

Formatting
Under the "Formatting" link you will need to adjust the date format and time for your blog according to your geographical location. Don't forget to save these changes.

Commenting
In the "Comments" section you can control how people can comment on your blog. If you set this to registered users you will avoid a lot of unwelcome spam. Setting the "Moderate Comments" option will enable you to view comments before they appear live on your site.

Comment Moderation

Permissions
You can choose to keep your blog private, invite readers to visit your blog or open your blog up to anyone and everyone.

Once these basic settings are configured you will be in a position to start making posts to your blog. Use the preview button often to help you confirm your changes are successful.

For more information on customising your blog see my post ....

Create a Free Blog at Blogger.com


Blogging has never been easier and thanks to Blogger.com it is absolutely free. You can create a blog about virtually anything you like and take advantage of this powerful blogging software.

Some of the Main Features of Blogger.com

Simple user-friendly interface
Use a blogspot subdomain or your own domain name
No restrictions on bandwidth
Unlimited video storage using YouTube
Photo storage using Picasa Web Album (1 GB)
Support for Mobile blogging


How Do I Get an Account at Blogger.com?
Anyone can sign up at Blogger.com. If you already have a Google account (eg gmail email address) you will find the process of signing up to Blogger.com very easy since Google owns the Blogger platform. The advantage of using your existing Google account is that you can gain instant access to many other Google Services such as Picasa Web Albums, Adsense, Google Reader and Webmaster Tools while you are signed in. If you don't yet have a gmail account you can apply for one at gmail.com. Should you wish to use you own email address you can do so but you will forfeit the advantage of immediate access to Google's network of tools and resources.

Once you have a Google account you are ready to sign on at Blogger.com. Simply direct your browser to Blogger.com and click on the "Create an Account" button.

Setting Up an Account at Blogger.com
Setting up your blog is a 3 step process: creating an account, naming your blog and choosing a template. You will be prompted for a name which you will use to sign all of your blog posts. As you will see your email address becomes your account name. Once you have created an account you will be free to create as many blogs as you wish using the one account.

Create an Account
Naming your blog requires some thought. Choose a name that is short, memorable and is associated with your blog theme. Long names are difficult to remember and are therefore best avoided.

The next choice you will be asked to make is to select a template. This can be changed at a later date so don't worry if you are uncertain about your choice at this stage. Choose the template that most closely resembles the look and feel of the site you wish to create.

Configuring Blogger.com Settings

Basic Settings
Before launching into your first post you will need to set up a few blog settings. From the "Settings" tab click on the "Basic" link and enter the blog title you wish to use and a short description of your site on the page which appears. Save these settings by clicking on the button at the bottom of the page.

Formatting
Under the "Formatting" link you will need to adjust the date format and time for your blog according to your geographical location. Don't forget to save these changes.

Commenting
In the "Comments" section you can control how people can comment on your blog. If you set this to registered users you will avoid a lot of unwelcome spam. Setting the "Moderate Comments" option will enable you to view comments before they appear live on your site.

Comment Moderation

Permissions
You can choose to keep your blog private, invite readers to visit your blog or open your blog up to anyone and everyone.

Once these basic settings are configured you will be in a position to start making posts to your blog. Use the preview button often to help you confirm your changes are successful.

For more information on customising your blog see my post ....

Create Search Engine Friendly Permalinks for Blogger

For any webmaster of a Blogger Blogspot blog good permalinks will help ensure that your traffic finds your site and is an important SEO consideration. Care needs to be taken to craft permalinks that are keyword rich and accurately describe your post. In this article I discuss how to manage the permalinks of each post to ensure you make the most of them.

What are Permalinks?
Permalinks are the permanent links to a post page. Blogger automatically generates a permalink based on the title of your post. Permalinks provide information to the viewer about the kind of content being pointed to.

Permalinks create permanent links to your Blogger posts which are indexed by search engines such as Google. Search engines use permalinks to categorise posts. Browsers use permalinks to help navigate to your posts. When you hover over a permalink in your browser you can read the post name in the status bar.

The permalink for this article is:

http://blogknowhow.blogspot.com/2009/02/improved-permalinks-for-blogger-posts


Permalink View in Browser

Tips for Working With Permalinks in Blogger
While other blogging software such as Wordpress allows the user to edit permalinks Blogger has no such feature. For this reason care needs to be taken when creating titles for your posts as the permalink generated from the title can't be changed later. The original permalink assigned at the point that the post is created remains the same no matter how many times you change the title of your post.

Another issue with Blogger is that it takes only the first 35-40 characters of your title to create the permalink so if you have a longer title you can run into problems. My suggestion is that you design your titles carefully if you want to avoid losing the end characters from your permalink. For instance a long title such as the one below would result in a shortened permalink which would lose the important fact that this post is related to working with Blogger:

http://blogknowhow.blogspot.com/2009/01/how-to-create-user-friendly-permalinks-for-your-blogger-posts

Fortunately there is a way around this problem. You will need to publish and then republish as I did with this post. The method involves creating a shorter title that will adequately summarise the content of your post (eg Improved Permalinks for Blogger Posts) and then publishing your post. Now go back and change the title to the one you prefer. In this case I changed the title to "How to Create User Friendly Permalinks For Your Blogger Posts." Now your title can be as long as you like. As you can see mine is longer than 40 characters. The permalink, however has remained the same even though the title has changed.

You can use this trick to create eye catching and memorable titles. It will also ensure that the permalink reflects a concise title and that unnecessary details in the permalink are removed. Creating concise permalinks is important for Search Engine Optimisation. Read more about Search Engine Optimisation in this blogs tutorial Tips for Search Engline Optimisation.

This tutorial has concentrated on crafting good permalinks as an SEO principle. It has covered ways to improve the permalinks of a Blogger blogspot blog to ensure they are keyword rich and accurately reflect the content of the post. Make sure you make the most of permalinks and see the difference in site traffic.

Thursday, February 19, 2009

Submit Your Blogspot Blog Sitemap to Google

I often see questions from beginner bloggers in forums about adding a sitemap of their Blogspot blog to Google. This is surprisingly easy to do although there is virtually no documentation about how to go about it. That's why I have written this tutorial with the beginner blogger in mind. It provides a set of simple step by step instructions to guide you through the process of adding a sitemap to Google. By following this tutorial you will have your Blogspot sitemap added to Google in less than 5 minutes flat.

Why Add a Sitemap to Google?
As Google owns the Blogger.com platform most sites are indexed by Google automatically. However, you might find as I have done that this process doesn't always run as smoothly or as quickly as you might like. Manually adding a sitemap to Google has some distinct advantages:

More likely to have timely indexing of your blog

More likely that all URLs on your site will be accessed

More frequent updating of your blog index in response to new posts

Increase in site traffic as a result of all your pages being indexed


Step by Step Guide to Adding Sitemap to Google
Follow this step by step walkthrough of how to add a sitemap to Google to your Blogspot Blog and begin enjoying the benefits.

1. Sign in to Google Webmaster Tools
Once set up this site will give you detailed analysis about how Google indexes your blog. Best way to get to Google Webmaster tools is to click on My Account on the Blogger Navbar and then choose Google Webmaster Tools from the list.

2. Navigate to the Webmaster Tools Dashboard
Directly below the word "Dashboard" in the top lefthand corner you will see the option to add a site. Click once inside the box to remove the default text. Now enter the full URL of your site in the box including the prefix http:// and click on the "Add Site" button. For example to add this site "blogknowhow" you would enter http://blogknowhow.blogspot.com/

3. Navigate to Webmaster Tools Overview
If all is going well you will now see your site in a list below the "Add Site" box. Click on your site in the list and you will be taken to "Dashboard>>Overview." It is easy to check you are in the right place as your site name will be listed in blue below the word "Overview".

In the overview menu you will find details about Google's current indexing of your site. If Google hasn't indexed your site yet you will see the message "No pages from your site are currently included in Google's index" displayed. Alternatively if Google has already discovered your site then you will get the following message "Googlebot has successfully accessed your home page" and "Pages from your site are included in Google's index."

4. Select Method of Verifying Your Site
Whether the pages of your site have been indexed or not you will be asked to click on the "Verify Your Site" link in the yellow box. At this point you will be given 2 options: one to verify your site by uploading an HTML file and the other by inserting a meta tag into the HTML coding on your site. As you do not have access to the server on Blogspot you will need to choose the second option. To do this select "add a meta tag" in the dropdown menu entitled "Choose Verification Method."

Immediately you make your choice you will be presented with a couple of lines of text which you will need to copy to the clipboard of your computer.

5. Go to Blogger Layout Tab of Your Site in a New Window
In another window open Blogger and sign in if you are not already signed in. From the Dashboard navigate to the "Layout" menu of your blog by clicking on the Layout tab. If you have created more than one blog make sure that you click on the appropriate title of your blog.

6. Edit the Template of Your Blog in Blogger
In the Layout menu follow the “Edit HTML” link (third from left under the Layout tab). At this point you need to search through the coding in the template for the first "Head" tag. This will be somewhere between line 7 and 10 from the top. Once you have located the correct spot paste the code for the metatag you created in Step 4 directly into the template taking care not to overwrite any existing code. Click on the "Save Template" button to update your blog.

If you wish to err on the side of caution you might consider backing up your template before you make any changes to it however as long as you are careful this precaution is probably not necessary.

Blogger Layout Edit HTML menu

8. Return to Webmaster Tools and Verify Site
Once you have saved the changes to your template return to Webmaster Tools and click on the "Verify" button at the bottom of the page in the "Dashboard>>Verify a Site" screen. You will then receive coonfirmation from Google that your site has been verified.

9. Navigate to Sitemaps in Webmaster Tools
Once your site is verified you can now move on to adding your sitemap. To do this navigate to Sitemaps by following the "Sitemaps" link in the sidemenu. This will take you to "Dashboard >> Sitemaps" where you will see a box with the URL of your site already added. Next to the box will be a button labelled "Submit Sitemap."

10. Add Sitemap in Webmaster Tools
As your blog was created in Blogspot we are going to make use of the rss or atom feed. Either can be used for this purpose.

On the Sitemaps page in Webmaster Tools type either atom.xml or rss.xml into the box provided to extend the displayed URL and click on the "Submit Sitemap" button. Using the same example as before http://blogknowhow.blogspot.com/ becomes either

http://blogknowhow.blogspot.com/atom.xml
or
http://blogknowhow.blogspot.com/rss.xml

All going well Google will then display a message indicating that your sitemap submission is pending. It can take some hours for your sitemap to be fully updated by Google. At that point you will be able to see the number of URLs identified by Google and the time of the last download. This is useful information as it will help you keep tabs on your for your Blogger.com blog site and identify any URLs that may be being missed. Now that you have your sitemap in place you can look forward to increased traffic as more visitors will now be able to find your site.

Google Webmaster Tools Sitemaps


Read This If Your Feed is Being Redirected
If you are redirecting your feed because you are using Feedburner for example you will need to add a query parameter to stop the redirect so that it will act as a sitemap.

Therefore instead of adding atom.xml you will need to add atom.xml?redirect=false to the site URL in the "Submit Sitemap" box. Thus http://blogknowhow.blogspot.com/atom.xml becomes http://blogknowhow.blogspot.com/atom.xml?redirect=false

If you have a lot of posts it would be worth your while adding the following parameter to have all your posts included:
atom.xml?redirect=false&start-index=1&max-results=100

In the above example Google will index your first 100 posts. If you have more than 100 posts you can create another sitemap in which case you would start your index at 101 instead of 1.

This tutorial has guided you through the process of authenticating your Blogger blog at Google Webmaster and adding a sitemap to ensure better crawling and indexing of your website.

Add a Sitemap to Your Blogspot Blog

I often see questions from beginner bloggers in forums about adding a sitemap of their Blogspot blog to Google. This is surprisingly easy to do although there is virtually no documentation about how to go about it. That's why I have written this tutorial with the beginner blogger in mind. It provides a set of simple step by step instructions to guide you through the process of adding a sitemap to Google. By following this tutorial you will have your Blogspot sitemap added to Google in less than 5 minutes flat.

Why Add a Sitemap to Google?
As Google owns the Blogger.com platform most sites are indexed by Google automatically. However, you might find as I have done that this process doesn't always run as smoothly or as quickly as you might like. Manually adding a sitemap to Google has some distinct advantages:

More likely to have timely indexing of your blog

More likely that all URLs on your site will be accessed

More frequent updating of your blog index in response to new posts

Increase in site traffic as a result of all your pages being indexed


Step by Step Guide to Adding Sitemap to Google
Follow this step by step walkthrough of how to add a sitemap to Google to your Blogspot Blog and begin enjoying the benefits.

1. Sign in to Google Webmaster Tools
Once set up this site will give you detailed analysis about how Google indexes your blog.

2. Navigate to the Webmaster Tools Dashboard
Directly below the word "Dashboard" in the top lefthand corner you will see the option to add a site. Click once inside the box to remove the default text. Now enter the full URL of your site in the box including the prefix http:// and click on the "Add Site" button. For example to add this site "blogknowhow" you would enter http://blogknowhow.blogspot.com/

3. Navigate to Webmaster Tools Overview
If all is going well you will now see your site in a list below the "Add Site" box. Click on your site in the list and you will be taken to "Dashboard>>Overview." It is easy to check you are in the right place as your site name will be listed in blue below the word "Overview".

In the overview menu you will find details about Google's current indexing of your site. If Google hasn't indexed your site yet you will see the message "No pages from your site are currently included in Google's index" displayed. Alternatively if Google has already discovered your site then you will get the following message "Googlebot has successfully accessed your home page" and "Pages from your site are included in Google's index."

4. Select Method of Verifying Your Site
Whether the pages of your site have been indexed or not you will be asked to click on the "Verify Your Site" link in the yellow box. At this point you will be given 2 options: one to verify your site by uploading an HTML file and the other by inserting a meta tag into the HTML coding on your site. As you do not have access to the server on Blogspot you will need to choose the second option. To do this select "add a meta tag" in the dropdown menu entitled "Choose Verification Method."

Immediately you make your choice you will be presented with a couple of lines of text which you will need to copy to the clipboard of your computer.

5. Go to Blogger Layout Tab of Your Site in a New Window
In another window open Blogger and sign in if you are not already signed in. From the Dashboard navigate to the "Layout" menu of your blog by clicking on the Layout tab. If you have created more than one blog make sure that you click on the appropriate title of your blog.

6. Edit the Template of Your Blog in Blogger
In the Layout menu follow the “Edit HTML” link (third from left under the Layout tab). At this point you need to search through the coding in the template for the first "Head" tag. This will be somewhere between line 7 and 10 from the top. Once you have located the correct spot paste the code for the metatag you created in Step 4 directly into the template taking care not to overwrite any existing code. Click on the "Save Template" button to update your blog.

If you wish to err on the side of caution you might consider backing up your template before you make any changes to it however as long as you are careful this precaution is probably not necessary.

Blogger Layout Edit HTML menu

8. Return to Webmaster Tools and Verify Site
Once you have saved the changes to your template return to Webmaster Tools and click on the "Verify" button at the bottom of the page in the "Dashboard>>Verify a Site" screen. You will then receive coonfirmation from Google that your site has been verified.

9. Navigate to Sitemaps in Webmaster Tools
Once your site is verified you can now move on to adding your sitemap. To do this navigate to Sitemaps by following the "Sitemaps" link in the sidemenu. This will take you to "Dashboard >> Sitemaps" where you will see a box with the URL of your site already added. Next to the box will be a button labelled "Submit Sitemap."

10. Add Sitemap in Webmaster Tools
As your blog was created in Blogspot we are going to make use of the rss or atom feed. Either can be used for this purpose.

On the Sitemaps page in Webmaster Tools type either atom.xml or rss.xml into the box provided to extend the displayed URL and click on the "Submit Sitemap" button. Using the same example as before http://blogknowhow.blogspot.com/ becomes either

http://blogknowhow.blogspot.com/atom.xml
or
http://blogknowhow.blogspot.com/rss.xml

All going well Google will then display a message indicating that your sitemap submission is pending. It can take some hours for your sitemap to be fully updated by Google. At that point you will be able to see the number of URLs identified by Google and the time of the last download. This is useful information as it will help you keep tabs on your for your Blogger.com blog site and identify any URLs that may be being missed. Now that you have your sitemap in place you can look forward to increased traffic as more visitors will now be able to find your site.

Google Webmaster Tools Sitemaps


Read This If Your Feed is Being Redirected
If you are redirecting your feed because you are using Feedburner for example you will need to add a query parameter to stop the redirect so that it will act as a sitemap.

Therefore instead of adding atom.xml you will need to add atom.xml?redirect=false to the site URL in the "Submit Sitemap" box. Thus http://blogknowhow.blogspot.com/atom.xml becomes http://blogknowhow.blogspot.com/atom.xml?redirect=false

If you have a lot of posts it would be worth your while adding the following parameter to have all your posts included:
atom.xml?redirect=false&start-index=1&max-results=100

In the above example Google will index your first 100 posts. If you have more than 100 posts you can create another sitemap in which case you would start your index at 101 instead of 1.

This tutorial has guided you through the process of authenticating your Blogger blog at Google Webmaster and adding a sitemap to ensure better crawling and indexing of your website.

Related Articles
List of Blog Know How Blogger Tutorials
10 Tips to Build Site Traffic for a Blogspot Blog

Monday, February 9, 2009

Add a Social Bookmarking Button to Blogger

In this tutorial you will learn how to add an Add This free Social Bookmarking button to your Blogger blog (Blogspot) blog. By adding this feature to your blog you will enable visitors to your blog to create links to popular social bookmarking sites such as Google, Technorati, Facebook, MySpace, Digg, Stumble Upon, Reddit, Delicious, Furl, Yahoo etc. Adding personal social bookmarks enables visitors to share these links with others thereby helping you attract more traffic to your site. For more information on the benefits of social bookmarking please refer to my article - Benefits of Social Bookmarking for Blogger bloggers.

Add This Share ButtonThis tutorial shows you how to place a social bookmarking button on your site by accessing a free social bookmark and feed button builder service called Add This. Add This will supply you with a simple piece of code which when placed in a widget will insert a social bookmarking button either at the end of each post or in the sidebar. If you wish you can add the social bookmarking button to both as I have done on this site. For those new to blogging don't worry if this sounds complicated as this article gives you step by step instructions suitable for any Blogger user including beginners.

How does an Add This Social Bookmarking Button Work?
The code from Add This places a button on your site which when clicked on by a visitor to your site opens a menu of the most popular social bookmarking services. When a selection is made by a visitor eg Delicious, Yahoo, Google, Facebook, MySpace, Stumble Upon they are given the option to submit your blog to their online bookmarks. Once a visitor submits your blog to a social bookmarking service Add This can provide you with useful analytics about bookmarks, feeds and emails depending on which buttons you enable on your site. This kind of statistical information from Add This will help you gain greater understanding of your site traffic and your most popular posts.

Add This Social Bookmarking Options


Steps for Adding a Social Bookmarking Button from Add This to Your Blogger Blog

1. Register for a free account with Add This

Add This Sign Up for a Free Account Page

2. Once you supply a username, email address, password and your website address sign up is pretty much instanteous.

3. After sign up is confirmed click on Get Your Button. This will take you to the Create Your Button Page

Add This Create a Button Page

4. On the Create Your Button page you will be asked to make some selections about your social bookmarking button.

What kind of Button? Select Sharing/bookmarking button

What Look? Choose any of the six button choices. For this example I am going to select the share button

Select Add This Share Button

Where? Select on a blog

Blogger Platform? Select Blogger

At this point the information your have entered should look like the picture below:

Add This Create a Button Page

Once you have confirmed that you have entered the correct information click on the Get Your Code button and you will be taken to the Get Your Code page.

5. From the Get Your Code page you will be given the option to Preview your button. Do so if you wish or move on to Step 6.


Having generated the code for your Add This Social Bookmarking button you now need to decide where to position it on your blog. You may either place your new Social Bookmarking Button beneath each post (see below) or in a sidebar.


Instructions for Placing a Social Bookmarking Button Beneath Each Post of Your Blogger Blog

Click on Blog Post Button option.

Highlight the Javascript code supplied by Add This

Copy the code to the Clipboard of your computer using Ctrl + C command

In a new window open your Blogger Blog and sign in

Navigate to Layout > Edit HTML

As a precaution Backup your template in case you inadvertently overwrite some code.

Once you have backed up place a tick in the Expand Widget Templates checkbox

Use the Ctrl + F command to open the toolbar which will appear at the bottom of your page while using Blogger. You can close this at any time using the Ctrl + F command or by clicking on the blue cross in the lefthand corner.

Now highlight the following line of code and using the Ctrl + C command copy and paste the code into the Search Box on the toolbar at the bottom of Blogger. This action will quickly locate the code for you in your Blogger template. You will be placing the code immediately before this tag.

<div class='post-footer'>


Return to Add This and highlight the Javascript button code supplied. Copy the code to your clipboard using the Ctrl + C command.

Reopen the Blogger window and place the cursor right before the tag that you located earlier.

Paste the Javascript code from Add This into the template using the Ctrl + V command.

Your code placement should look like that pictured below

Code Placement for Free Social Bookmarking Button from Add This
Click on Save Template

Now click on View Blog from the top menu and navigate to the end of your first post. If all instructions have been followed you will now have a social bookmarking button at the bottom of each post.


Instructions for Placing a Social Bookmarking Button in a Sidebar of Your Blogger Blog

Follow the Add This automated process by clicking on Add the Menu to My Blog button. This will place an Add This social bookmarking button in a widget in your sidebar as you see on this site.

Blog Know How Sidebar Showing Add This Bookmark Button

This Blogger tutorial has covered the steps involved in adding a free Add This Social Bookmarking Button to your Blogger blog (Blogspot blog). Grow your Blogger (Blogspot) blog today by adding a free Add This social bookmarking button which will enable visitors to bookmark your site and share your posts with others. Add This will provide statistical tracking of social bookmarking activity on your site and help you determine your most popular posts.

Related Articles
List of Blog Know How Blogger Tutorials
10 Tips to Build Site Traffic for a Blogspot Blog
Add Social Bookmark Buttons to a Blogger Blogspot Blog
Free Social Bookmarking Buttons for Blogger

Sunday, February 1, 2009

About Blog Know How

Blog Know How is a blog devoted to helping bloggers using the Blogger.com platform to customize their website. You will find blogging tips, tricks and secrets that will enable you to increase the functionality of your site. Also included are Blogger tutorials that will guide you through the process of making custom changes to your blog. Blog Know How articles are specifically tailored with the beginner blogger and newbie in mind.

Related Articles
List of Blog Know How Blogger Tutorials