BlogKnowHow apologies for the technical problems with the site. We are working on it and hope to resolve the issue as soon as possible.

Monday, November 30, 2009

Add Your Blogger Blog to Facebook

In today's Blogger tutorial I will show how to add your Blogger blog (Blogspot blog) to Facebook so that your updated content can be read right from your Facebook profile. Importing your Blogger blog into Facebook will only take you a few minutes to set up but will likely produce quite a few extra readers.

By importing your blog into Facebook your Blogger posts become available to all your Facebook friends and family. Everytime you post new articles to your Blogger blog they will automatically appear on your Wall in Facebook and in your friends News Feeds. It is also possible to remove any content that you do not wish to be displayed which may be handy for some.

Advantages of Importing Your Blog into Facebook

  • Increase your web presence
  • Enjoy added interest in your blog articles and new readers
  • No need to replicate your blog articles or content on Facebook

Disadvantages of Importing Your Blog into Facebook
  • If you blog for profit think carefully about importing your Blogger blog into Facebook as you are likely to experience a drop off in traffic and a reduction in revenue earnings as fewer people will visit your actual blog. One possible way around this is to set your blog's RSS feed to show summaries only that way ensuring that anyone interested will need to visit your blog to read the whole article.

How to Import or Add Your Blogger Blog to Facebook
  1. Login to Facebook or Sign up to Facebook if you are not already a member

  2. From your Facebook profile page go to Settings > Application Settings which you will find in the top right hand corner


  3. Select Notes from the list of applications displayed on the page

  4. Click on Import a Blog in the right sidebar

    Facebook - Add Notes Screen (Settings, Applications Settings, Notes)
  5. Enter the URL address of your blog

    either website URL:
    http://blogknowhow.blogspot.com

    or your Blogger feed: http://blogknowhow.blogspot.com/feeds/posts/default?alt=rss
    Please note it is not necessary to add the feed of your blog as Facebook will autodetect this
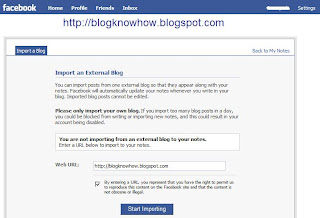

    Facebook - Import a Blog Screen
  6. You will need to tick the box below this to confirm that the content is not illegal or obscene and that you have the right to permit Facebook to reproduce the content of your blog. Any problems click Cancel and reenter your blog URL address

  7. Click Start Importing

  8. Facebook will now import your feed and you will be taken to a preview screen to make sure the content matches your blog. If it does go ahead and confirm the import by clicking on the Confirm Import button

    Facebook - Preview Screen for import a blog showing latest content

  9. Go to your Wall in Facebook to check that your Blogger posts are now available to all your Facebook friends and family.


Tips and Troubleshooting
  • If your Blogger blog is members only the blog import will fail as Facebook will be unable to detect your blog's feed

  • To remove a blog post from your Wall in Facebook click on the Remove button on the righthand side

  • If your images are not displaying (there seems to be a bit of a glitch with this) then you may need to try importing your blog using Networked Blogs


In this Blogger tutorial I have discussed how to import your Blogger blog into your Facebook profile. I have also pointed out some advantages and disadvantages of adding your Blogger blog to your Facebook profile. I will be talking some more about importing blogs into Facebook in the future which is likely to be of interest to those with multiple Blogger blogs.


Related Articles
List of Blog Know How Tutorials for Blogger Blogs

Monday, November 2, 2009

Add Profile Images to Blogger Comments

Today I will show you how easy it is to have Blogger (Blogspot) display profile images in the embedded comments section of your blog even if you are using a custom template.

About a month ago Blogger announced that it was enabling profile images (profile avatars) in the embedded comments section on Blogger (Blogspot) as part of its 10th birthday feature series. The new profile image feature which has been available on other commenting options has now been extended to the embedded comments option. This is good news if you are using a default template as you will now see a small avatar next to your visitors comments and your own avatar if you have uploaded a profile image.


Default Blogger Templates - Enabling Profile Images
Profile images work on default Blogger templates and have been automatically enabled by Blogger. If you are using a default Blogger template with embedded comments enabled and have recent comments on a post you will see a profile image to the left of visitor comments (provided they have uploaded one that is). Your profile avatar will also display when you respond to visitor comments again provided you have uploaded one. (To upload your profile photo click on Add Photo at the Dashboard). If profile images are not displayed enable them by going to Settings > Comments and checking the Yes radio button at the bottom of the page which says Profile Images Enabled.

Custom Blogger Templates - Enabling Profile Images
If you are using a custom template you may still be able to see profile images in your embedded comments section. Check out Settings > Comments to make sure Profile Images are enabled. If you can't see profile images you can still add this feature by tweaking your Blogger template. Follow the instructions below to have Blogger display profile images in the embedded comments section of your custom Blogger template.

Add Profile Images to Comments Section of a Custom Blogger Template
If you are using a custom Blogger template you can use the following method to add profile images to the embedded comments section of your Blogger template.

  1. Login to Blogger if not already logged in

  2. Go to Design > Edit HTML

  3. Back up your Blogger template as a precaution by downloading the full template to your computer

  4. Expand Widget Templates by checking the box on the right hand side

  5. Find the following line in your Blogger template by using CTRL + F:

    <dl id='comments-block'>

  6. Change the above line to the following:

    <dl expr:class='data:post.avatarIndentClass' id='comments-block'>

  7. Scroll down a few lines and find the following line in your Blogger template:

    <a expr:name='data:comment.anchorName'/>

  8. Directly before the above line paste the following code block:

    <b:if cond='data:comment.favicon'>
    <img expr:src='data:comment.favicon' height='35px' style='margin-bottom:-2px;' width='35px'/>
    </b:if>
    <a expr:name='data:comment.anchorName'/>
    <b:if cond='data:blog.enabledCommentProfileImages'>
    <data:comment.authorAvatarImage/>
    </b:if>

  9. Click Save Template

  10. Click View Blog and navigate to a page with commenting to see avatars next to comments in the embedded comments area


Tips and Troubleshooting
  • If you have added the author commenting highlight hack to your Blogger template there will be 2 instances of the code at Step 7 to change

  • If your template does not have the code mentioned in Step 5 and Step 6 check that dl has not be replaced by div. In this case leave the div as is and replace the rest of the code in the line.

  • Blogger has only enabled profile images for Blogger and Google profiles so if your visitors comment using identities such as "Anonymous" or "Name/URL" their image profile will not be displayed. If OpenID, AIM or other identities are used these favicons will be displayed instead.

  • Profile avatars load last so they will not prevent visitors viewing your content if you have a lot of comments on some pages


In today's Blogger tutorial (Blogspot tutorial) you have learned how to enable profile images in the embedded comments section in Blogger. If you are using a default Blogger template this can be achieved by enabling profile avatars in your Blogger template. If you are using a third party custom template I have shown you a Blogger hack that will display profile images next to comments on your blog. As always I am interested in how you get on with this tweak. Good luck!


Related Articles
List of Blog Know How Tutorials for Blogger Blogs
Add Missing Embedded Comments Section to a Blogger Template
Embed Comments Form in a Blogger Template
How to Get More Comments on a Blogger Blog

Sunday, November 1, 2009

Add CSS Styling to Blockquotes in a Blogger Template

Today I continue the series of Blogger tutorials (Blogspot tutorials) by showing you how to apply CSS styling to blockquotes in a Blogger template. Other articles I have already published on the subject of CSS styling include:

How to Add, Delete or Remove Blogger Image Borders
How to Align and Justify Posts in Blogger
How to Add a Divider Between Blogger Posts
How to Add or Change a Background Image in a Blogger Template.

Today's tutorial on Blogger blockquotes will be useful if you are using a default Blogger template or a third party custom template. It will show you how to change your blockquote area in the following ways:

  • Add a background color to the blockquote
  • Add a border around the background of the blockquote
  • Add or change the color of the blockquote text
  • Add or change padding around the text
  • Add or change the margin
  • Add a background image

Blogger beginners you can relax as I have written this Blogger tutorial with you in mind. I will walk you through the steps of styling the blockquote section and you will see that it is not as daunting as it first appears. This Blogger tutorial assumes no knowledge of CSS styling. I have rated the difficulty level as easy to medium because it does involve making adjustments to your Blogger template.

How to Change the Blockquote Section of a Blogger Template

First of all let's take a look at the CSS Styling for the blockquote section of a default Minima Blogger template.

.post-body blockquote {
line-height:1.3em;
}

.post blockquote {
margin:1em 20px;
}

.post blockquote p {
margin:.75em 0;
}

As you can see the blockquotes area of this Minima template has minimal styling. Apart from line height and margin indentation there has been no additional code added to improve the look of the template.

Minima Blockquotes No Extra CSS Styling
Let's go ahead and give the blockquotes in your Blogger posts some styling. I will use the Minima template to show you but you can do the same for another default template or custom template. As always back up your Blogger template by downloading it to your computer before you begin to make any changes.

  1. CSS Styling to Add a Background Color to Blockquotes
    Adding a background color to the blockquote area can be achieved in 1 of 2 ways.

    1. One way is to enter the hex color directly into the styling as I have done below. This code will add a light grey background to the blockquote area.

      .post-body blockquote {
      line-height:1.3em;
      background-color: #cccccc;
      }

    2. Another way to add a background color using CSS styling for the blockquote area is to make use of the variable names already set up. The border color is light grey #cccccc by default in a Minima template. The advantage of this option is that if you decide to change the border color under Layout > Fonts and Colors the blockquote color will automatically change to the new color too.

      .post-body blockquote {
      line-height:1.3em;
      background-color: $bordercolor;
      }

      If you wanted the background color to be the same as the blog title color rather than the border color you would write this instead

      .post-body blockquote {
      line-height:1.3em;
      background-color: $titlecolor;
      }

  2. CSS Styling to Add a Border Around Blockquotes
    You have your background in place now let's add a narrow border around the background to add some more definition. The following will add a 1px solid border around the outside of your blockquote area in your Blogger posts.

    .post-body blockquote {
    line-height:1.3em;
    background-color: #cccccc;
    border: 1px solid #cc6600;
    }

    or if using variables

    .post-body blockquote {
    line-height:1.3em;
    background-color: $bordercolor;
    border: 1px solid $titlecolor;
    }

    Blockquotes With a Background and Background Border
  3. CSS Styling to Add Padding Around Blockquotes
    Now if we were to leave the styling at this point one of the problems would be that the text would butt up against the background which is not a good look. To create some space between the text and the background edge all the way around we use CSS styling to add some padding like this:

    .post-body blockquote {
    line-height:1.3em;
    background-color: #cccccc;
    border: 1px solid #cc6600;
    padding: 20 px;
    }

    or if using variables

    .post-body blockquote {
    line-height:1.3em;
    background-color: $bordercolor;
    border: 1px solid $titlecolor;
    padding: 20 px;
    }

    Blockquotes With a Background, Background Border and Padding
  4. CSS Styling to Add or Change the Text Color of Blockquotes
    If you want to accent your blockquote area in your posts one effective way to do this is to make the blockquote text color a different color from the text color of your pages. We do this by picking a color and adding the following line to the code:

    .post-body blockquote {
    line-height:1.3em;
    background-color: #cccccc;
    border: 1px solid #cc6600;
    padding: 20 px;
    color: #cc6600
    }

    or if using variables

    .post-body blockquote {
    line-height:1.3em;
    background-color: $bordercolor;
    border: 1px solid $titlecolor;
    padding: 20 px;
    color: $titlecolor;
    }

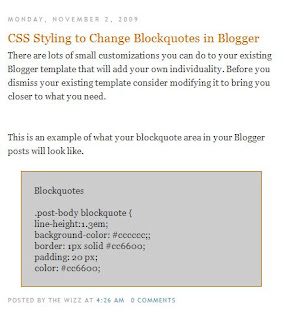
    Blockquotes With a Background, Background Border, Padding and Change of Text Color

Tips and Troubleshooting
If you want to add further modifications to the blockquotes area of your Blogger template here are several other possibilities.

  1. CSS Styling To Change the Margin of Blockquotes
    You can increase the margin from 1em to 1.5em by changing the margin line to
    margin: 1.5em 20px;

  2. CSS Styling to Add a Background Image to Blockquotes
    You can have your own image as a background in your blockquotes area of your posts by adding this line:

    background: url(http://URL of your image.jpg);

In today's Blogger tutorial (Blogspot tutorial) you have learned how to add CSS styling to the blockquotes area of your Blogger posts. I have shown you how to add a background, a background border, change the text color, add padding, change the margin and add a background image to the blockquotes code block. If you have a moment please let me know how you got on customizing your own Blogger template. Any questions please ask.


Related Articles
List of Blog Know How Tutorials for Blogger Blogs
How to Add, Delete or Remove Blogger Image Borders
How to Align and Justify Posts in Blogger
How to Add a Divider Between Blogger Posts
How to Add or Change a Background Image in a Blogger Template