BlogKnowHow apologies for the technical problems with the site. We are working on it and hope to resolve the issue as soon as possible.

Tuesday, December 28, 2010

Add a Comments Counter Button to Blogger Blogspot

In this Blogger tutorial (Blogspot tutorial) you will learn how to add a comments counter button to Blogger (Blogspot) to show off the number of comments each of your posts has received.

A comment counter button (bubble) will have the effect of encouraging visitors to comment on your Blogger blog and also help to highlight the credibility of your articles.


Installing this Blogger hack to add a comment counter button only takes a few minutes. The changes needed to add the comment bubble to Blogger while not difficult do involve adding a small snippet of code to your Blogger template in two places. For this reason I strongly urge you to back up your Blogger template before attempting this blogger hack.

Blogger Tutorial Difficulty - easy to medium


How to Add a Comments Counter Bubble to Blogger
A Step-by-Step Walkthrough
The following steps will insert a fully clickable comments counter button on the same line as the post title in Blogger. The comments counter is right aligned by default.

  1. Log in to Blogger and the blog you wish to apply these changes to

  2. Select Design > Edit HTML

  3. Click on Download Full Template to back up your template before you make any changes

  4. Check the Expand Widget Templates box

  5. In the CSS Styling section of your Blogger template and just before the ]]></b:skin>

    .comments-button {
    width : 48px;
    height : 48px;
    background : url(https://blogger.googleusercontent.com/img/b/R29vZ2xl/AVvXsEhOAtKzKSu1isk_ogKXQ_AjufJKPdBZMhkA9aWct6HpXPlvKNUli1ZVovL62YABdIvpbrlPbslmPSlUG2KJcmwJeLFwt-LDPQQGF2lehA-5MmT2ZuyMB38il5UwmdhdHQ9jsaTysJljwFKE/s200/comment-counter-bubble.png) no-repeat;
    float : right;
    font-size : 18px;
    margin-top : -15px;
    margin-right : 2px;
    text-align : center;
    padding-top:10px;
    }

  6. Now find the following block of code using CTRL key + F

    <b:includable id='post' var='post'>
    <div class='post hentry uncustomized-post-template'>
    <a expr:name='data:post.id'/>
    <b:if cond='data:post.title'>
    <h3 class='post-title entry-title'>
    <b:if cond='data:post.link'>
    <a expr:href='data:post.link'><data:post.title/></a>

  7. Copy this code block:

    <b:if cond='data:post.allowComments'>
    <a class='comments-button' expr:href='data:post.addCommentUrl' expr:onclick='data:post.addCommentOnclick'><data:post.numComments/></a>
    </b:if>

  8. Insert as follows:

    <b:includable id='post' var='post'>
    <div class='post hentry uncustomized-post-template'>
    <a expr:name='data:post.id'/>
    <b:if cond='data:post.title'>
    <h3 class='post-title entry-title'>
    <b:if cond='data:post.allowComments'>
    <a class='comments-button' expr:href='data:post.addCommentUrl' expr:onclick='data:post.addCommentOnclick'><data:post.numComments/></a>
    </b:if>

    <b:if cond='data:post.link'>
    <a expr:href='data:post.link'><data:post.title/></a>

  9. Save template and then view blog to admire your new comment counter badge.


Tips and Troubleshooting
  1. If you prefer you can replace the button image I have provided with your own image. You can find other buttons easily enough by doing a Google search with a term like "speech button icons".

    Upload your button to a hosting service such as Photobucket and change the URL address of the image in the CSS styling section. The following example will render a smaller blue button. Note I have reduced the font size to accommodate the change. You may need to play around with the settings to get the font sizing right for your image.

    .comments-button {
    width : 48px;
    height : 48px;
    background : url(https://blogger.googleusercontent.com/img/b/R29vZ2xl/AVvXsEjBCESuDqVaLeY9cdRLRXZ2N-VaHdnk7CT23nyCgCkLW-0fcwu3iXiYF3supJppw7Qb_XuiF2Z-McJQal8udJl7ND0PlzSBHjrY-TH-bxacOTkmaJ8mzuSz7MJq9gI4oQ9Hx2mnKTbgj87e/s200/comment-counter-bubble-2.png) no-repeat;
    float : right;
    font-size : 14px;
    margin-top : -15px;
    margin-right : 2px;
    text-align : center;
    padding-top:10px;
    }


  2. If you want your comment counter to be left aligned instead of right you will need to change the CSS styling from float:right; to float:left;

In today's Blogger tutorial I have covered how to add a comments counter to a Blogger blog (blogspot blog) that will appear to the right of your blog post title. A comments counter is a way to encourage visitors to comment and is a way of showing off the credibility of your blog posts. Good luck! Any comments about installing this blogger hack are most welcome.


Related Articles
List of Blog Know How Tutorials for Blogger Blogs
Tips to Add Digg Button to Blogger Blogspot
Add Twitter Followers Counter to Blogger
Add Twitter Badge or Button to Blogger
Add a Social Bookmarking Button to Blogger
Add Social Bookmark Buttons to Blogger

Monday, December 27, 2010

How to Change Bullet Point Style in Blogger (Blogspot) Lists

In Part 1 of this three part series of Blogger tutorials I discuss how to change bullet point styles of lists you may want to include in Blogger posts. This first Blogger tutorial deals with unordered lists and how these can be styled using CSS in Blogger (Blogspot). The second part of these tutorials will deal with ordered lists while part 3 discusses bullet point changes you can make to your sidebar, footer and menus.

Today you will learn how to:

  • change the style of bullet points in unordered lists
  • add bullet points to unordered lists if they are absent
  • add an image instead of a bullet to lists in your Blogger posts

This tutorial is rated easy and is designed so that even Blogger newbies can make the changes they want to their Blogger template. Changing the bullet point style involves changing the CSS styling in your Blogger template (Blogspot template). Join me as I walk you through this step by step guide.

How to Add Bullet Points to a Blogger Post
If you are still using the old Blogger editor you will need to add bullet points manually to any unordered lists you create in Blogger posts. If you are using the new editor the work is done for you. Either way though this is the type of code that generates unordered lists:
<ul><li>Create your own list markers in Blogger</li>
<li>Create unordered lists in Blogger</li>
<li>Create bullet points in Blogger</li>
</ul>

Any text can be placed between the two <li></li> tags. Simply copy this list into a Blogger post and substitute your text for mine and you will have an unordered list.

Circular Bullet Points
Circular bullets (also known as markers or discs) are displayed in Blogger by default whenever unordered lists appear. This means that whenever the <ul></ul> tags are used in Blogger posts a leader dot or disc will appear before each line of text denoted by <li>. (Note I will discuss ordered lists <ol></ol> tags in part two of this tutorial).

An unordered list in a Blogger post using the <ul></ul> tags would appear like this:
  • Change Bullet Point Style in Blogger
  • Add Bullets to Blogger
  • Changing the look of unordered lists in Blogger


We can make lots of changes to the look of these filled discs or filled circles by changing the CSS styling in Blogger. For instance we can have squares, or we can choose to have no bullet point at all. Here's how.

To Add Square Bullet Points to Blogger (Blogspot)
The following code will replace the filled circle bullet points with squares instead:

  1. Login to Blogger if not already logged in

  2. From the Dashboard go to Design >Edit HTML

  3. Back up your template

  4. Find the posts section of your CSS stylesheet which will be before ]]></b:skin> tag

  5. For the following default Blogger templates eg "Simple" add the following CSS code to the post section like this

    .post ul li {
    list-style: square;
    }


  6. Save template and view blog post to see the circular bullet points have been replaced by square ones


To Add Circle Bullet Points to Blogger (Blogspot)
To add unfilled circle list markers or bullet points to Blogger posts do the following:

  1. Follow steps 1-4 as per square bullets

  2. Add the following code to the posts section of the CSS stylesheet of your Blogger template by entering the following code:

    .post ul li {
    list-style: circle;
    }


  3. Save the changes to your template and view a blog post to see the empty circle bullet points


How To Indent Bullet Points in Blogger
There are two ways to increase the indentation of list style markers or bullet points.

  1. Using the Inside or Outside Element
    The indentation of bullet points can be varied using the "inside" element. By default the list will be "outside" unless the "inside element" is used. The following code shifts the indentation of the list further to the right.

    .post ul li {
    list-style: circle inside;
    }


  2. Custom Indentation CSS Styling
    It is also possible to add custom indentation styling to lists. For instance here I have added a 2.5em indent using the following code to the circles example:

    .post ul li {
    list-style: circle;
    margin-left: 2.5em;
    }


How To Replace Bullet Points with an Image in Blogger (Blogspot)
Sometimes you may prefer to have an image list marker or icon instead of a bullet point. You will need to host your image somewhere such as a free image hosting service eg Flickr or Photo Bucket. Follow the steps below to replace bullet points in your Blogger posts with an image

  1. Follow steps 1-4 as per square bullets

  2. In the CSS styling of the posts section of your Blogger template and before the </head> insert the following code:

    .post ul li {
    list-style: url("http://URLaddressofImage.gif");
    }


  3. Replace URLaddressofImage with the URL address of the image you have uploaded to an image hosting service. Note in most cases the file will have a .gif extension. If the extension is anything other than .gif you will need to change this too.


  4. Save the changes to your Blogger template and navigate to a post page to see your image list marker installed


How to Remove the Bullet Points from Blogger Posts
If you are going for a minimalist look you may prefer to have no bullet points in the lists in your Blogger posts. In this case:

  1. Follow steps 1-4 as per square bullets

  2. In the CSS styling of the posts section of your Blogger template and before the </head> insert the following code:

    .post ul li {
    list-style: none;
    }


Related Articles
List of Blog Know How Tutorials for Blogger Blogs
How to Add CSS Styling to Blockquotes in Blogger
How to Add, Delete or Remove Blogger Image Borders
How to Align and Justify Posts in Blogger
How to Add a Divider Between Blogger Posts
How to Add or Change a Background Image in a Blogger Template

Thursday, December 23, 2010

Remove Image Border in Default Blogger Templates Simple and Awesome Inc

In this Blogger tutorial I show you how to remove the border around images in Blogger posts (Blogspot posts) when using one of the latest default Blogger templates Simple or Awesome Inc.

If you are using an older generation Blogger template or a custom template the solutions contained in this article may work for you however it is more likely that you will need to follow the methods to remove image borders outlined in my previous Blogger tutorial Change or Remove Blogger Image Borders (Part 1)

Below I explore two methods of removing or deleting image borders in the Blogger template Simple. The first method shows you how to remove the image border using Template Designer and the second method outlined describes how to remove the image border manually by changing the code.


Method 1 - Use Template Designer to Remove Image Border in Blogger
  1. From the Blogger Dashboard go to Design > Template Designer
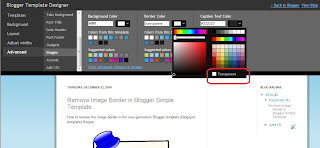
  2. Then select Advanced > Images
  3. Under Border Color use the drop down arrow to open the color palette
  4. Change the setting to transparent by checking the small box on the bottom right hand side marked "transparent"

    How to change the image border to transparent in Blogger
    Note: If you are using the black version of the Awesome Inc template you will need to change the Background Color to transparent too. Click on the down arrow of the color palette and select transparent.

    Remove border Awesome Inc Blogger template
  5. Click Apply to Blog to save your changes to the template
  6. Navigate to any post page to view images in posts without the border


Method 2 - Change Template Code to Manually Remove Image Border from the New Default Blogger Templates
  1. From the Blogger Dashboard go to Design > Edit HTML
  2. Back up your Blogger template
  3. Find this line amongst the declared variables at the top of your template

    <Variable name="image.border.color" description="Border Color" type="color" default="transparent" value="#cccccc"/>
  4. Change to the value of the border color to transparent like so

    <Variable name="image.border.color" description="Border Color" type="color" default="transparent" value="transparent"/>
  5. Save your changes to the template
  6. Navigate to any post page that has an image and see that the border around the image is no longer visible


In this Blogger tutorial (Blogspot tutorial) I have shown you how to remove or delete the border around images in Blogger posts for the newest generation of default Blogger templates Simple and Awesome Inc. I have discussed two different methods to remove the border around the images either by adjusting the settings in the Blogger Template Designer or by manually changing the code of the variable in the CSS styling section of the default Blogger template


Related Articles
List of Blog Know How Tutorials for Blogger Blogs
How to Change or Remove Blogger Image Borders (Part 1)
How to Change the Blog Title Border in Blogger Minima Template
How to Add CSS Styling to Blockquotes in Blogger
How to Align and Justify Posts in Blogger
How to Add a Divider Between Blogger Posts
How to Add or Change a Background Image in a Blogger Template
How to Remove the Link from a Single Image in a Blogger Post

Monday, December 6, 2010

How to Remove or Change the Blog Title Border in Blogger (Blogspot) - Minima Template

In this Blogger tutorial I discuss how to change the blog title border color or remove the border in a Blogger template (Blogspot template) by changing either the CSS styling of the border manually or by using the Blogger Template Designer feature.

Lots of bloggers have updated their Blogger template to the new default series of Blogger templates for 2010. There are however many of you who are still using the default Minima template from 2006 (and there are lots of good reasons to do so) so this tutorial is for you and anyone else who is using a custom Blogger template based on Minima.

You will learn how to change the border styling around the blog title to suit your individual requirements. You can either change the border color or remove the border altogether. If you want to remove the border around images in Blogger posts (Blogspot posts) then please refer to my Blogger tutorial How to Add, Change or Remove the Border Image in Blogger Posts

Remove or Change the Blog Title Border in Blogger (Blogspot)
There are two simple ways to remove the border around the blog title in Blogger. We are going to hide the border rather than actually remove the code that creates it by making the border color transparent. I will also show you how to change the border color.

Method 1 discusses how to do this using the Blogger Template Designer while Method 2 describes how to change the blog title border manually by changing the code.


Method 1 - Using Blogger Template Designer

  1. Log in to Blogger
  2. From the Dashboard go to Design > Template Designer
  3. Go to Templates > Advanced > Border Color


  4. Choose the down arrow color picker to activate the color palette window
  5. Choose transparent which is below the color palette to remove the border around the blog title completely. You now will see the blog title border disappear. Or choose a new color from the color palette to change the color

    Remove Blog Title Border in Blogger
    Remove Blog Title Border

    Change Blog Title Border Color in Blogger
    Change Blog Title Border Color

  6. Click on Apply to Blog to save your changes


Method 2
If the Blogger Template Designer is not working on your template for some reason you can tweak the code in your template to remove the border around the blog title

  1. Log in to Blogger
  2. From the Dashboard go to Design > Edit HTML
  3. Back up your Blogger template
  4. Find the border color variable which will be near the top of the template code


  5. Change the border color value to transparent to remove the border altogether so that your code now looks like this:

    <Variable name="bordercolor" description="Border Color"
    type="color" default="#ccc" value="transparent">


    or change the value to a color of your choice eg

    <Variable name="bordercolor" description="Border Color"
    type="color" default="#ccc" value="#ff7f00">

  6. Save your template and view your blog to see that the border around the blog title has been removed or changed color

    Remove Blog Title Border CSS Styling in Blogger


Tips and Troubleshooting
Below are some tips to help you further customize the blog title border width. You can either remove the inner border, thicken the outer border or thicken both borders around the blog title in Blogger.

  1. To change the width of the border around the blog title in Minima change the following:

    #header {
    margin: 5px;
    border: 1px solid $bordercolor;
    text-align: center;
    color:$pagetitlecolor;
    }

    to

    #header {
    margin: 5px;
    border: 10px solid $bordercolor;
    text-align: center;
    color:$pagetitlecolor;
    }

    This code increases the border width from 1px to 10px

  2. To remove the inner border around the blog title in Minima change the code to the following:

    #header {
    margin: 5px;
    border: 10px solid $bordercolor; (remove this line)
    text-align: center;
    color:$pagetitlecolor;
    }

  3. To increase the width of the outer border around the blog title in Minima change this code

    #header-wrapper {
    width:660px;
    margin:0 auto 10px;
    border:10px solid $bordercolor;
    }


In this Blogger tutorial you have learned two methods to change the color of the border around a blog title in Blogger blog (Blogspot blog). I have also shown you how to increase the size of the border width. This tutorial applies particularly to the default Blogger template Minima but also is relevant for any blogger using a custom Blogger template based on Minima. Good luck!


Related Articles
List of Blog Know How Tutorials for Blogger Blogs
How to Add CSS Styling to Blockquotes in Blogger
How to Add, Delete or Remove Blogger Image Borders
How to Align and Justify Posts in Blogger
How to Add a Divider Between Blogger Posts
How to Add or Change a Background Image in a Blogger Template